
Bake the Perfect Chewy Chocolate Chip Cookies Recipe Today
Chocolate chip cookies hold a special place in every baker’s heart, with this chewy chocolate chip cookies recipe promising pure comfort and joy.
Soft, golden edges mingle with gooey chocolate morsels that melt on your tongue.
Every home baker dreams of creating the perfect batch of cookies that sparks memories and smiles.
These delectable treats blend classic ingredients with a secret technique for maximum chewiness.
Rich butter, premium chocolate, and a precise mixing method ensure each cookie emerges from the oven perfectly textured.
The aroma will fill your kitchen with warmth and anticipation.
Bake a batch and watch as friends and family gather around, eager to savor these irresistible morsels of happiness.
Why These Chocolate Chip Cookies Stay Chewy and Soft
Everything You Need for the Chewiest Cookies
Wet Ingredients:Dry Ingredients:Mix-In Ingredients:Steps to Bake Soft, Gooey Chocolate Chip Cookies
Step 1: Whisk Butter and Sugars
Grab a spacious mixing bowl and pour in melted butter that has cooled slightly.
Add brown and white sugars, then vigorously whisk for two minutes until the mixture becomes fluffy and well-combined.
This technique ensures your cookies will have that perfect chewy texture.
Step 2: Blend Wet Components
Introduce vanilla extract, whole egg, and extra egg yolk into the buttery sugar mixture.
Whisk energetically until the blend transforms into a light, creamy consistency.
The additional yolk contributes a luxurious richness to your future cookies.
Step 3: Combine Dry Elements
Gradually fold in:Stir gently until ingredients just merge.
A few flour streaks are acceptable, so avoid overmixing.
Step 4: Fold Chocolate Treasures
Sprinkle semi-sweet chocolate chips throughout the dough, ensuring even distribution for consistent chocolate enjoyment in every bite.
Step 5: Shape and Chill Dough
Scoop roughly 1/4 cup portions and roll into smooth balls.
Place on parchment-lined baking sheet.
Refrigerate for one hour or freeze for 30 minutes.
Chilling prevents excessive spreading and intensifies flavor complexity.
Step 6: Fire Up the Oven
Preheat oven to 325°F, which guarantees even baking and maintains internal chewiness.
Step 7: Position Cookie Rounds
Arrange chilled dough balls on parchment or silicone mat-lined baking sheet, spacing approximately 3 inches apart to allow proper spreading.
Step 8: Bake Until Golden
Slide sheets into preheated oven.
Bake 12-15 minutes, watching for golden edges and slightly underbaked centers – the hallmark of perfectly chewy cookies.
Step 9: Rest and Transfer
Let cookies rest on baking sheet for 5 minutes to stabilize structure.
Carefully transfer to wire rack for complete cooling.
Step 10: Preserve Deliciousness
Store completely cooled cookies in airtight container.
They’ll remain fresh for up to 5 days – if you can resist eating them all immediately!
Tips for Consistent Texture and Flavor
Storing Cookies So They Stay Fresh and Chewy
What to Enjoy With Your Cookie Batch
Delicious Variations on This Classic Cookie
FAQs
Brown sugar adds moisture and creates a softer, chewier texture, while white sugar helps the cookies spread and become crisp around the edges.
The extra egg yolk increases fat content, making the cookies richer, softer, and more tender with a deeper flavor profile.
Chilling prevents cookies from spreading too quickly, helps develop deeper flavor, and creates a more consistent texture by allowing flour to absorb moisture evenly.
Corn starch helps create a softer, more tender cookie by interfering with gluten formation and adding a delicate, melt-in-your-mouth texture to the final baked cookie.
Print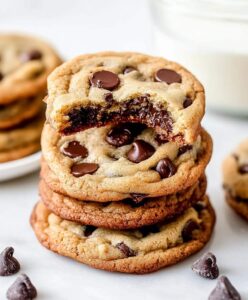
Chewy Chocolate Chip Cookies Recipe
- Total Time: 1 hour 15 minutes
- Yield: 24 1x
Description
Irresistible chocolate chip cookies combine classic comfort with gourmet delight, promising sweet moments of pure bliss. Crisp edges, melty chocolate, and buttery goodness invite you to savor each delectable bite.
Ingredients
Main Ingredients:
- 1 1/2 cups semi sweet chocolate chips
- 3/4 cup unsalted butter
- 1 cup brown sugar
- 1/2 cup granulated sugar
- 1 egg
- 1 egg yolk
Dry Ingredients:
- 2 1/3 cups all purpose flour
- 1 teaspoon baking soda
- 1 tablespoon corn starch
- 1/2 teaspoon salt
Flavor Enhancers:
- 1 tablespoon vanilla extract
Instructions
- In a spacious mixing vessel, combine melted butter that has slightly cooled with brown and white sugars. Vigorously whisk for approximately two minutes until the mixture becomes light and thoroughly integrated.
- Introduce vanilla extract, whole egg, and additional egg yolk into the butter-sugar blend. Whisk energetically until the mixture transforms into a creamy, smooth consistency.
- Carefully fold in flour, baking soda, corn starch, and salt. Gently incorporate dry ingredients with wet components, maintaining a delicate touch and allowing minimal flour streaks to remain visible.
- Fold semi-sweet chocolate chips throughout the dough, ensuring even distribution for consistent chocolate presence in each cookie morsel.
- Create uniform dough portions using a 1/4 cup measure. Gently roll into smooth spheres and place on parchment-lined surface. Refrigerate for one hour or freeze for 30 minutes to enhance flavor development and prevent excessive spreading.
- Preheat oven to 325F, selecting a lower temperature to promote even baking and maintain optimal chewiness.
- Position chilled dough balls on prepared baking sheet, maintaining approximately 3 inches between each cookie to allow proper expansion during baking.
- Bake for 12-15 minutes, monitoring for golden-tinged edges and slightly underdone center. This technique ensures a delectable chewy texture as cookies cool.
- Let cookies rest on baking sheet for five minutes, facilitating initial setting before transferring to wire rack for complete cooling.
- Store completely cooled cookies in sealed container, preserving freshness for up to five days and maintaining their delightful texture.
Notes
- Chill the dough thoroughly to prevent excessive spreading and create a more concentrated, rich flavor profile during baking.
- Use room temperature ingredients, especially eggs, to ensure even mixing and consistent cookie texture.
- For gluten-free adaptation, substitute all-purpose flour with a high-quality gluten-free flour blend that includes xanthan gum for better structure.
- Prep Time: 1 hour
- Cook Time: 15 minutes
- Category: Desserts, Snacks
- Method: Baking
- Cuisine: American
Nutrition
- Serving Size: 24
- Calories: 150
- Sugar: 10 g
- Sodium: 80 mg
- Fat: 7 g
- Saturated Fat: 4 g
- Unsaturated Fat: 3 g
- Trans Fat: 0 g
- Carbohydrates: 20 g
- Fiber: 1 g
- Protein: 2 g
- Cholesterol: 30 mg
Clara Thompson
Recipe Developer & Culinary Educator
Expertise
Developing accessible single-serving recipes, Food writing and content creation, Plant-based and allergen-friendly cooking, Culinary education and workshop facilitation
Education
Oregon Culinary Institute (Portland, OR)
Diploma in Culinary Arts
Specialized in plant-based cooking and sustainable kitchen practices.
Portland Community College
Certificate in Food Writing and Media
Focused on recipe writing, food photography, and digital content creation.
Clara’s food journey began with a curiosity for color, texture, and ingredients pulled straight from the garden. Her background in plant-forward cooking and creative writing gives her a unique edge – she makes healthy, flavorful food feel inviting, not intimidating.
She specializes in meals that work for busy lives and different diets, all without sacrificing taste. Clara’s voice comes through in every recipe she writes – clear, kind, and encouraging.