The Ultimate Christmas Present Cookies Recipe for Holiday Joy
Sweet memories and childhood nostalgia collide in these delightful christmas present cookies that sparkle with festive cheer.
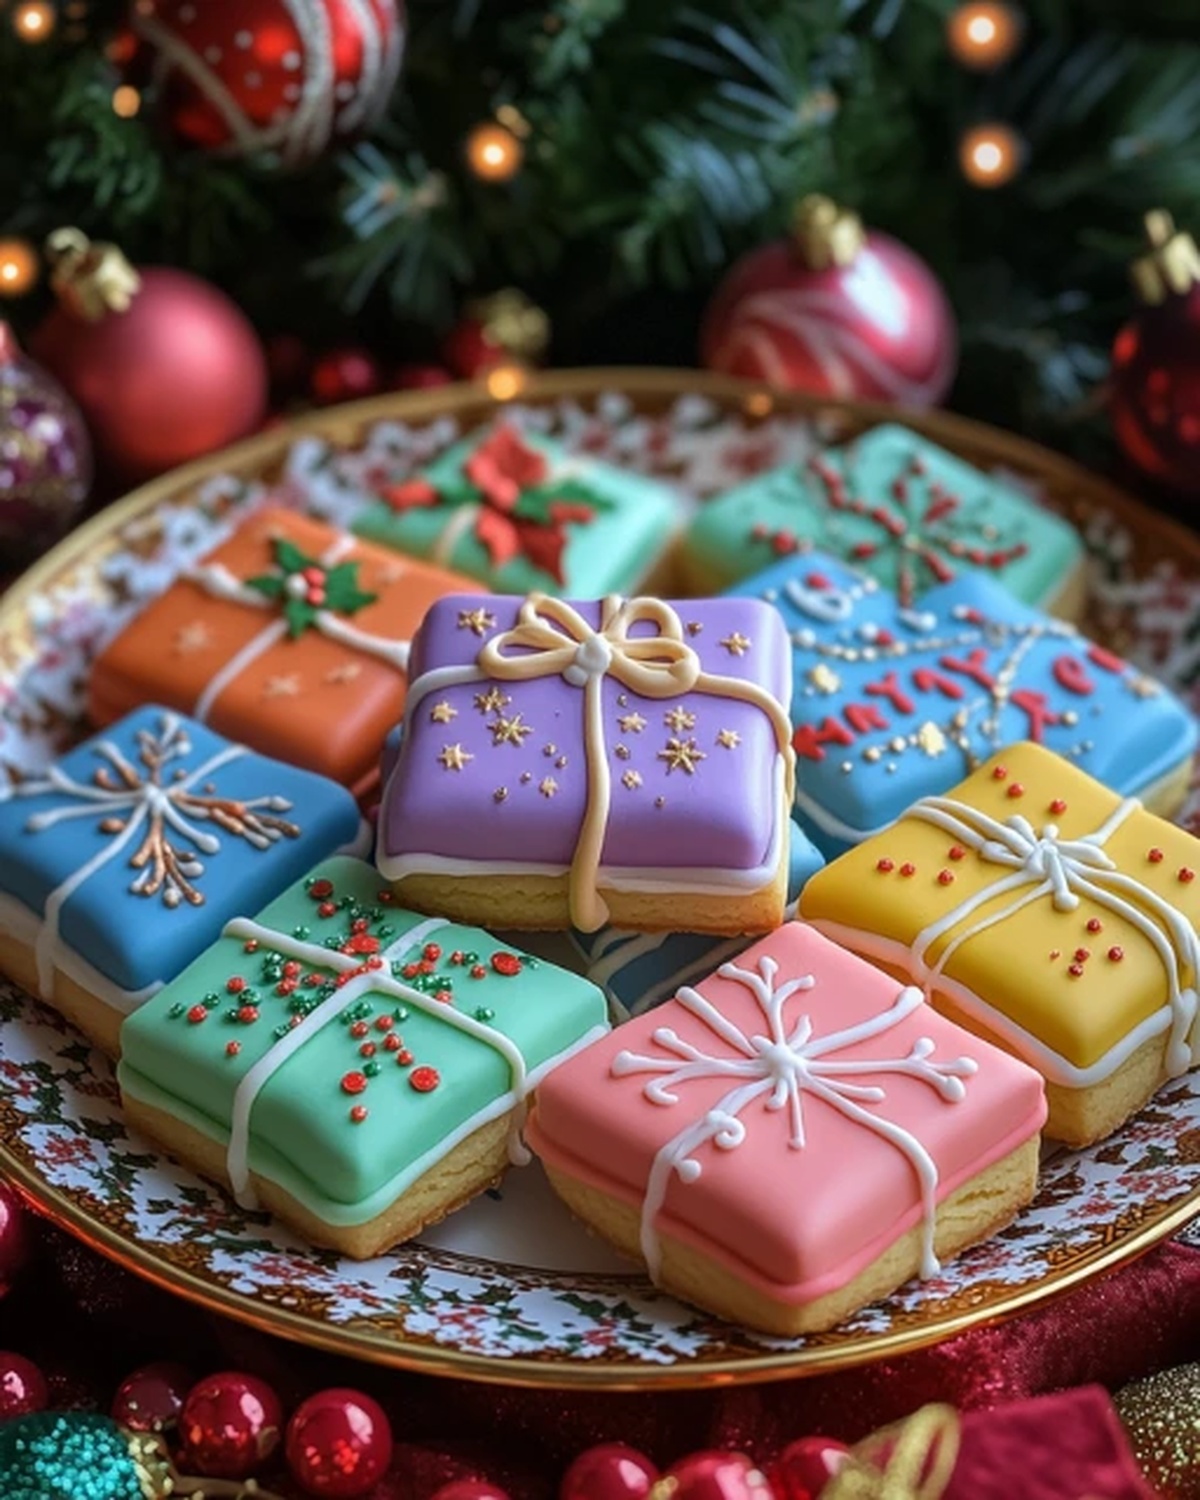
Wrapped like tiny gift packages, each cookie brings a touch of playful magic to your holiday table.
Sugar and sprinkles come together in a delectable surprise waiting to be unwrapped.
Decorated with colorful icing and ribbons of frosting, these treats look almost too beautiful to eat.
Baking becomes an adventure of creativity and joy when you craft these adorable edible presents.
Perfect for sharing at gatherings or gifting to loved ones, these cookies capture the spirit of giving.
You’ll fall in love with how simple yet stunning these festive treats can be.
Grab your apron and let the holiday baking begin!
Cookies That Look Like Presents and Taste Like Celebration

Christmas Present Cookies Festive Ingredients
Main Ingredients:
Butter: Provides rich, creamy flavor to the cookie base.
Granulated Sugar: Adds sweetness and helps create a tender texture.
Flour: Creates the primary structure of the Christmas present cookies.
Egg: Binds ingredients and adds moisture to the dough.
Flavor Enhancers:Leavening and Seasoning:Decorative Ingredients:
Powdered Sugar, Meringue Powder, Water: Combine to create smooth royal icing.
Gel Food Coloring: Provides vibrant colors for decorating.
Edible Glitter, Sprinkles: Adds festive holiday sparkle to cookies.
Baking Christmas Present Cookies That Spread Joy

Step 1: Whip Up the Cookie Base
Grab a spacious mixing bowl and blend softened butter with granulated sugar until the mixture becomes creamy and airy. Introduce an egg, vanilla extract, and a splash of almond extract for an extra flavor boost. Mix thoroughly until everything combines smoothly.
Step 2: Combine Dry Ingredients
In another bowl, thoroughly mix:Gently fold the dry ingredients into the wet mixture, stirring until a soft, pliable dough forms.
Step 3: Chill and Rest the Dough
Shape the dough into a smooth disk, wrap it snugly in plastic wrap, and let it relax in the refrigerator for at least an hour. This helps the flavors meld and makes the dough easier to handle.
Step 4: Shape Your Festive Cookies
Warm up the oven to 350°F. Dust a clean surface with flour and roll out the chilled dough to a quarter-inch thickness. Use square or rectangular cookie cutters to create present-shaped treats. Carefully transfer the cut cookies onto a parchment-lined baking sheet.
Step 5: Bake to Golden Perfection
Slide the baking sheet into the oven and bake for 8-10 minutes. Watch for lightly golden edges – that’s your signal they’re ready! Let the cookies rest on the baking sheet briefly before moving them to a cooling rack.
Step 6: Craft Magical Royal Icing
Whisk together:Create a smooth, pipeable icing. Divide the icing and experiment with gel food coloring to get festive hues.
Step 7: Transform Cookies into Edible Gifts
Use piping bags with fine tips to create a base layer of icing. Once dried, add ribbons, bows, and delightful decorations using contrasting colors. Sprinkle edible glitter or fun sprinkles for that extra holiday magic. Each cookie becomes a miniature gift ready to spread joy!
Cookie Tips for the Perfect Present Look
Storing and Enjoying Christmas Present Cookies Later
Christmas Present Cookies Companion Ideas
Christmas Present Cookie Gift Styles
FAQs
The key flavor extracts are vanilla extract and optional almond extract, which add depth and richness to the cookie’s taste profile.
Chill the dough for at least 1 hour in the refrigerator, which helps prevent spreading during baking and makes the dough easier to roll and cut into precise present shapes.
Gel food coloring is recommended because it provides vibrant colors without changing the icing’s consistency, allowing for precise and bright decorative details on your Christmas Present Cookies.
Yes, you can prepare the cookie dough in advance and refrigerate it for up to 3 days before baking, which makes holiday cookie preparation more convenient and flexible.
Clara Thompson
Recipe Developer & Culinary Educator
Expertise
Developing accessible single-serving recipes, Food writing and content creation, Plant-based and allergen-friendly cooking, Culinary education and workshop facilitation
Education
Oregon Culinary Institute (Portland, OR)
Diploma in Culinary Arts
Specialized in plant-based cooking and sustainable kitchen practices.
Portland Community College
Certificate in Food Writing and Media
Focused on recipe writing, food photography, and digital content creation.
Clara’s food journey began with a curiosity for color, texture, and ingredients pulled straight from the garden. Her background in plant-forward cooking and creative writing gives her a unique edge – she makes healthy, flavorful food feel inviting, not intimidating.
She specializes in meals that work for busy lives and different diets, all without sacrificing taste. Clara’s voice comes through in every recipe she writes – clear, kind, and encouraging.