Magical Easter Egg Layer Cake Recipe: A Springtime Delight
Sweet surprises await in this delightful Easter egg layer cake that merges childhood nostalgia with grown-up baking skills.
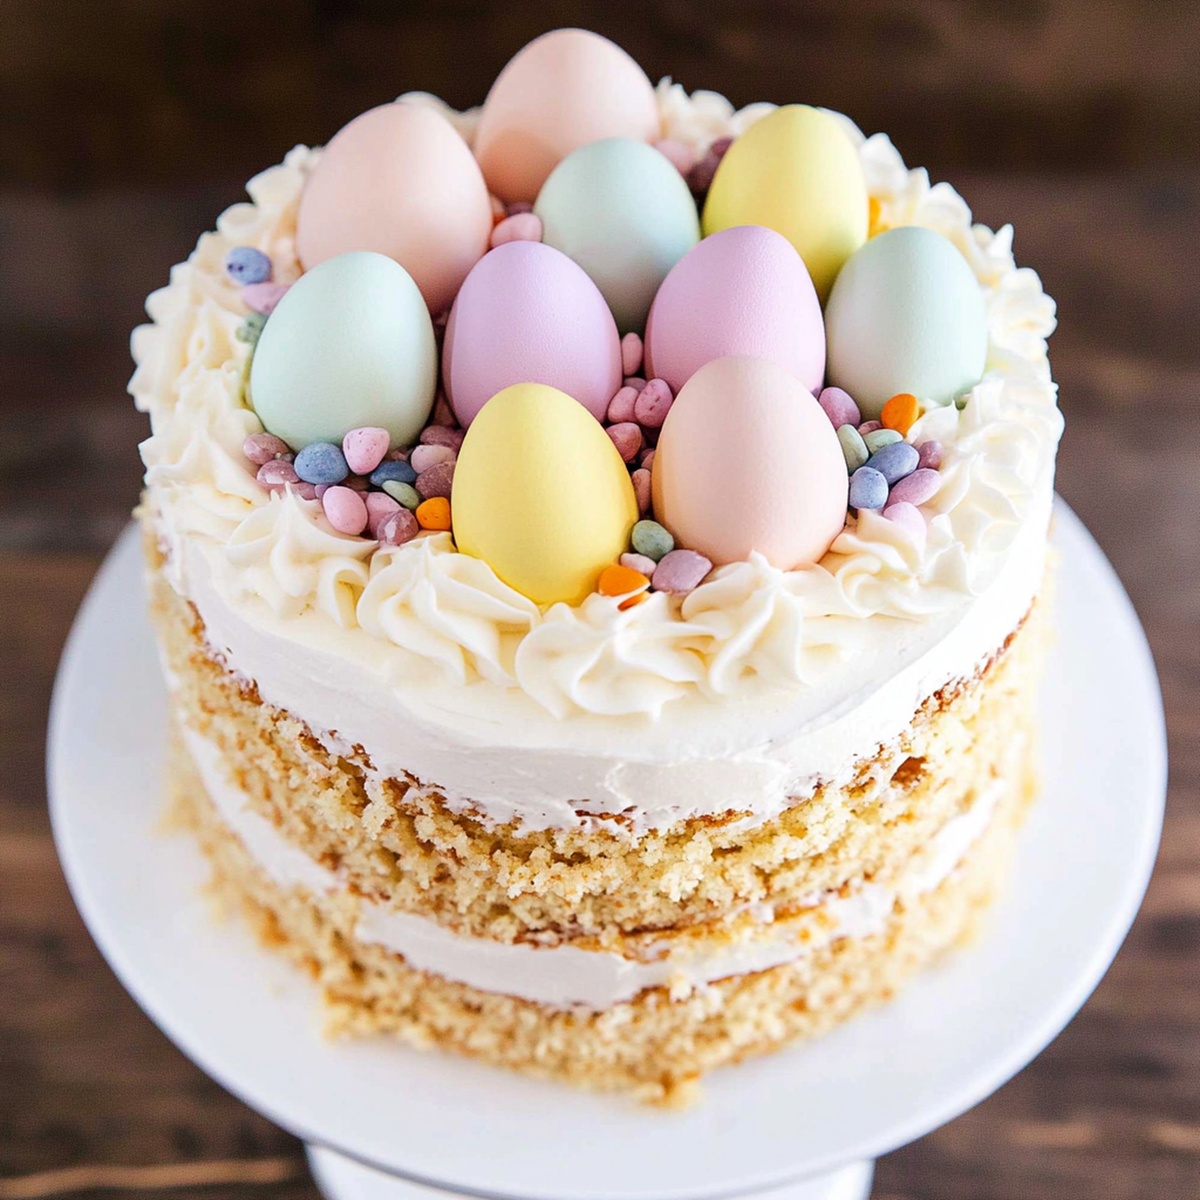
Colorful and whimsical, our dessert captures the playful spirit of spring celebrations.
Pastel frosting swirls between rich chocolate cake layers create a magical centerpiece for any gathering.
Crafting this showstopping treat requires patience and a dash of creativity.
Decorative chocolate eggs nestled between moist cake layers add unexpected texture and visual appeal.
Light, airy, and packed with flavor, each slice promises a delectable journey through springtime memories.
You’ll want to slice into this stunning creation and savor every decadent moment.
Easter Egg Layer Cake Festive Centerpiece
Ingredients for Easter Egg Layer Cake
Dry Ingredients:Wet Ingredients:Decorative Ingredients:How to Build Easter Egg Layer Cake Layers
Step 1: Prepare Baking Space
Get your oven ready by heating it to 350F.
Grab three round cake pans and coat them with cooking spray or butter, then line the bottoms with parchment paper for easy cake removal.
Step 2: Mix Dry Ingredients
Grab a mixing bowl and combine:Whisk these ingredients together until they’re perfectly blended and free of lumps.
Step 3: Create Creamy Butter Base
In a separate large bowl, cream together butter and sugar until the mixture becomes light and fluffy.
Add eggs one at a time, mixing thoroughly after each addition.
Pour in milk and continue mixing until everything is smooth and well incorporated.
Step 4: Blend Cake Batter
Gently fold the dry ingredient mixture into the wet ingredients.
Stir just until combined – be careful not to overmix, which can make the cake tough.
Step 5: Add Festive Colors
Divide the cake batter into separate bowls.
Use gel food coloring to create vibrant pastel shades that remind you of Easter eggs.
Think soft blues, delicate pinks, and gentle yellows.
Step 6: Bake Colorful Layers
Pour each colored batter into its prepared pan.
Slide the pans into the preheated oven and bake for 25-30 minutes.
Check doneness by inserting a toothpick – it should come out clean with no wet batter.
Step 7: Cool and Decorate
Allow cakes to cool completely on wire racks.
Once cooled, frost and stack the layers to create a stunning Easter egg-inspired masterpiece.
Tips for Decorating a Showstopping Easter Egg Layer Cake
How to Keep Easter Egg Layer Cake Fresh
Serving Suggestions for Easter Egg Layer Cake
Creative Variations on Easter Egg Layer Cake
FAQs
Use gel food coloring instead of liquid. Gel colors are more concentrated, require less product, and won’t thin out your batter, ensuring bright colors and perfect cake consistency.
Yes, substitute cake flour with a gluten-free all-purpose flour blend that contains xanthan gum. Ensure all other ingredients are gluten-free and check measurements might need slight adjustment.
Always grease your pans thoroughly and line the bottom with parchment paper. This creates a non-stick surface and makes removing layers much easier without damaging them.
Use a kitchen scale to divide batter precisely between bowls before adding food coloring. Weigh each bowl to guarantee equal distribution and consistent layer thickness.
Print
Easter Egg Layer Cake Recipe
- Total Time: 50 minutes
- Yield: 12 1x
Description
Delightful Easter Egg Layer Cake brings springtime magic to dessert tables with its playful pastel layers and creamy frosting. Rich chocolate cake nestles between smooth buttercream, creating a festive centerpiece that promises sweet celebrations for family gatherings.
Ingredients
Main Ingredients:
- 1 1/2 cups granulated sugar
- 3/4 cup unsalted butter (room temperature)
- 4 large eggs
- 1 cup whole milk
- 2 1/2 cups cake flour
Leavening Agent:
- 1 tablespoon baking powder
Decorative Ingredients:
- Gel food coloring (various colors)
- Buttercream frosting (for filling and decoration)
- Assorted Easter candies (for topping)
Instructions
- Prepare the baking environment by heating the oven to 350F (175C) and preparing three round cake pans with grease and parchment lining.
- Sift together cake flour, baking powder, and salt in a mixing bowl to ensure smooth, lump-free dry ingredients.
- Cream unsalted butter and sugar in a separate large bowl until light and airy, creating a fluffy base for the cake.
- Incorporate eggs individually into the butter mixture, thoroughly blending after each addition to create a smooth, uniform texture.
- Gradually stream milk into the butter-egg mixture, mixing until completely integrated and creating a silky liquid base.
- Gently fold dry ingredients into the wet mixture, stirring just until combined to maintain the cake’s delicate structure.
- Divide the prepared batter into separate bowls, using gel food coloring to create vibrant, distinct layers of your choosing.
- Carefully distribute the colored batters into the prepared cake pans, ensuring even spreading for consistent layer heights.
- Bake in the preheated oven for 25-30 minutes, checking doneness by inserting a toothpick that should emerge clean and dry.
- Remove cakes from oven and allow to cool completely on wire racks before proceeding with frosting and assembly.
Notes
- Use gel food coloring for vibrant, even colors without altering cake batter consistency.
- Allow cake layers to cool completely before frosting to prevent melting and sliding.
- Chill cake layers in refrigerator for 15-20 minutes before frosting for easier handling and smoother decoration.
- Consider gluten-free flour blend as a direct substitute for cake flour to make recipe celiac-friendly.
- Prep Time: 20 minutes
- Cook Time: 30 minutes
- Category: Desserts
- Method: Baking
- Cuisine: American
Nutrition
- Serving Size: 12
- Calories: 250
- Sugar: 15 g
- Sodium: 150 mg
- Fat: 10 g
- Saturated Fat: 5 g
- Unsaturated Fat: 3 g
- Trans Fat: 0 g
- Carbohydrates: 36 g
- Fiber: 1 g
- Protein: 4 g
- Cholesterol: 50 mg
Jack Sullivan
Founder & Culinary Storyteller
Expertise
Single-recipe development with a narrative approach, Culinary storytelling and food history, Seasonal and regional ingredient utilization, Home cooking techniques adapted for modern kitchens
Education
New England Culinary Institute (Montpelier, VT)
Certificate in Culinary Arts
Focused on farm-to-table cooking, sustainable practices, and modern plating techniques.
Asheville-Buncombe Technical Community College
Associate Degree in Culinary Arts
Emphasized Southern Appalachian cuisine and local ingredient sourcing.
Jack grew up surrounded by smoky skillets and handwritten recipes in the mountains of North Carolina. His roots in Appalachian cooking shaped the way he sees food – as something that connects people, tells a story, and holds meaning.
With hands-on training and a background in sustainable, regional cooking, Jack started Boil And Broil to make meaningful meals more accessible. He’s all about one-dish recipes that are simple to follow but rich with flavor and history.