The Ultimate Garlic Parmesan Cheeseburger Bombs Recipe for Foodies
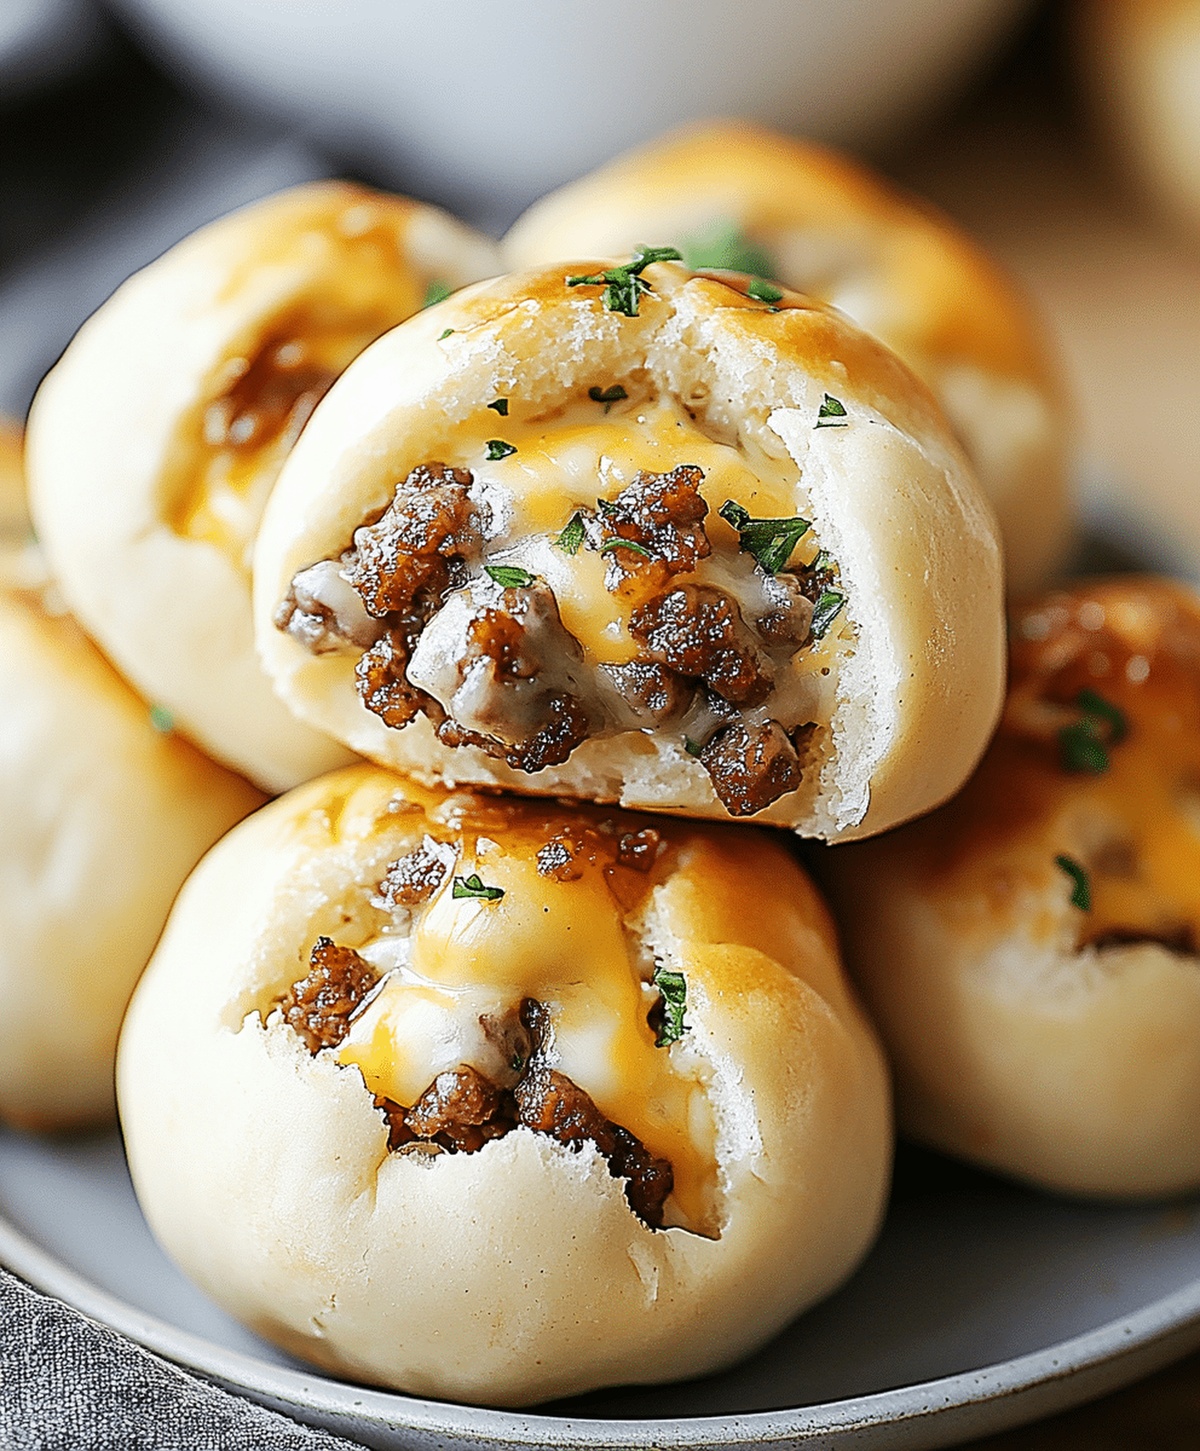
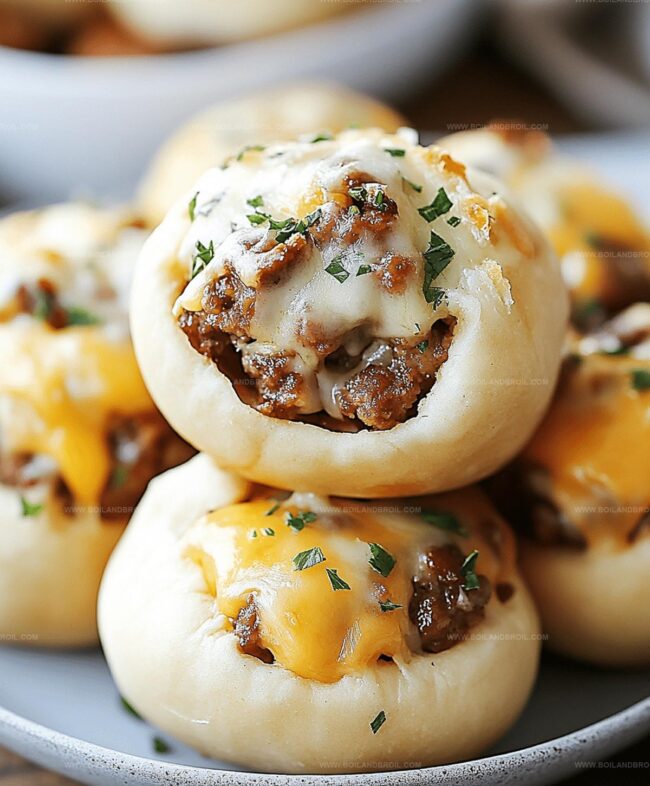
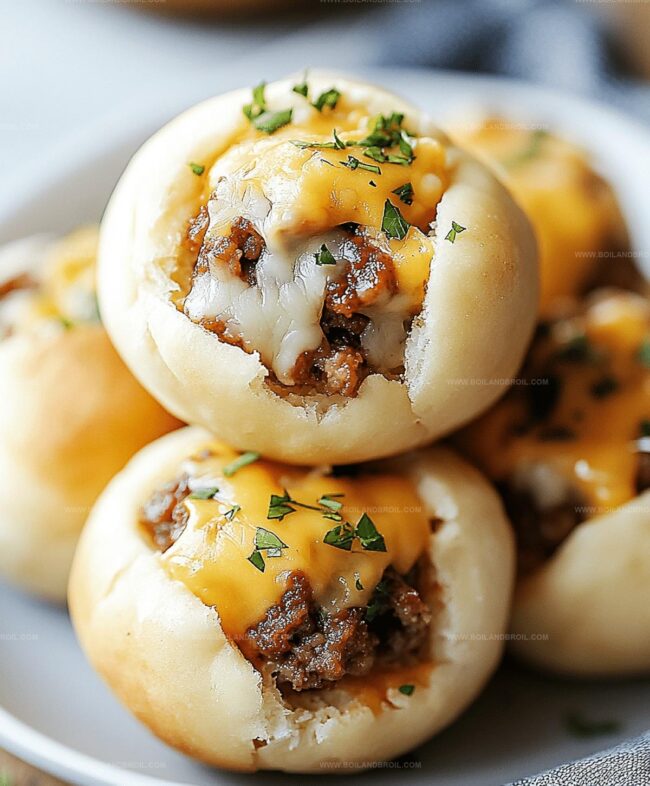
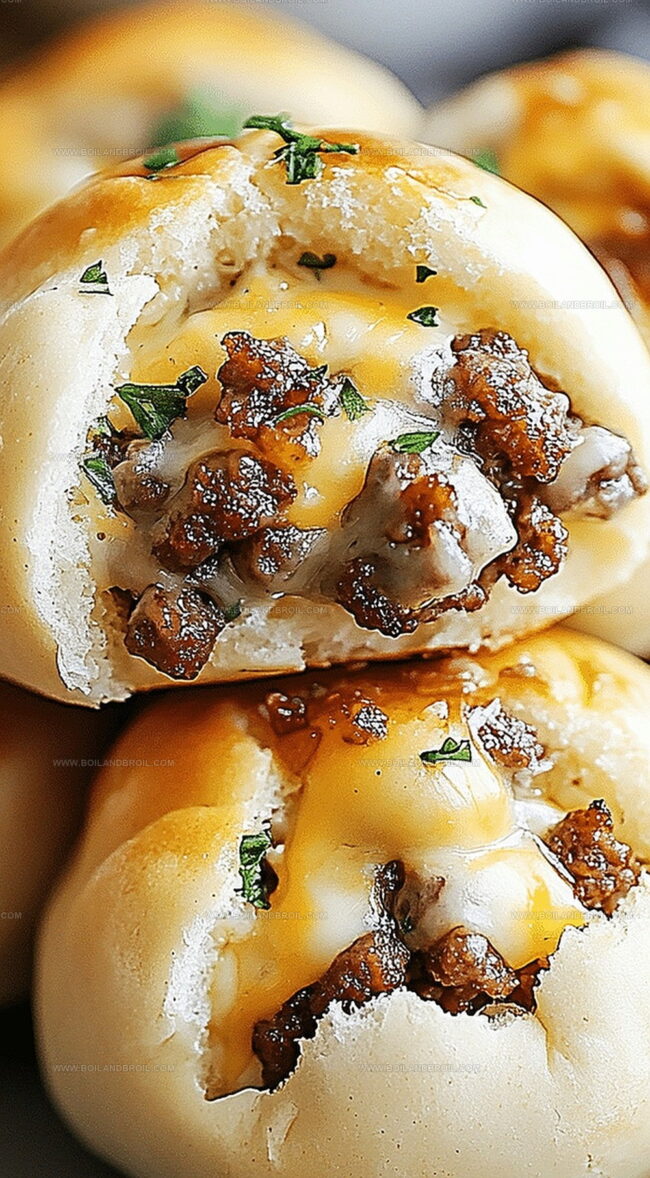
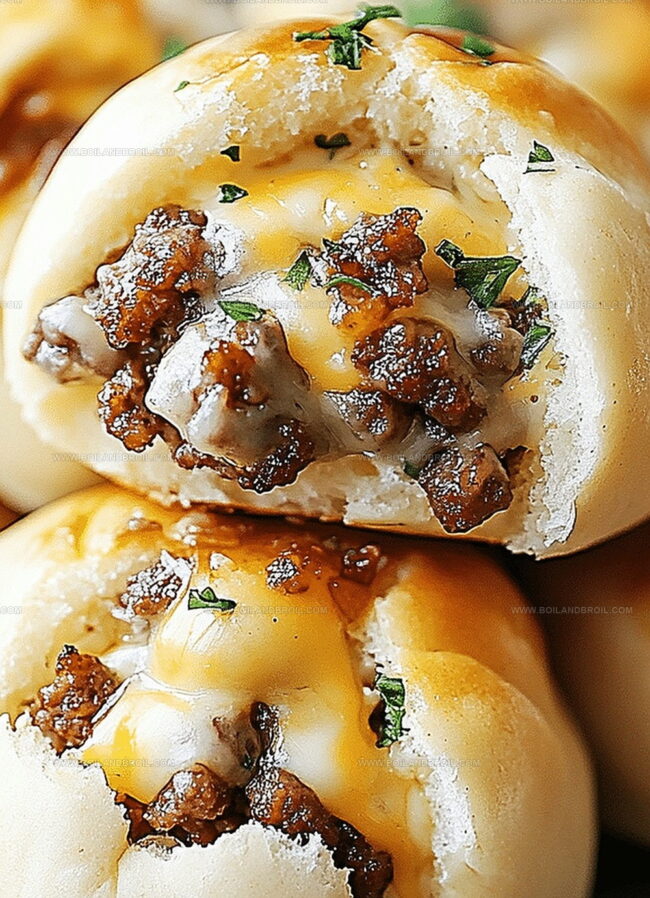
Crispy golden cheeseburger bombs packed with melted parmesan and robust garlic promise an explosion of flavor in every bite.
Small pockets of savory goodness await you inside these delectable handheld treats.
Imagine biting through a perfectly crisp exterior into a molten center bursting with meaty richness.
Cheese lovers will appreciate the unexpected twist on classic burger ingredients.
Each morsel combines ground beef, sharp cheese, and aromatic garlic in a compact, irresistible package.
Home cooks can easily assemble these crowd-pleasing morsels with minimal kitchen effort.
Prepare to wow everyone at your next gathering with these addictive little flavor bombs that disappear faster than you can plate them.
Garlic Parmesan Cheeseburger Bombs: Bold Flavors In Every Bite
Cheeseburger Bombs With Garlic Parmesan Contents
Main Ingredients:
Ground Beef and Cheese:Dough and Seasoning:Finishing Touches:Cooking Garlic Parmesan Cheeseburger Bombs
Step 1: Warm Up The Oven
Turn your oven to a toasty 375°F and get ready for some delicious magic.
Step 2: Sizzle The Ground Beef
Grab a skillet and cook the ground beef over medium heat until it turns a beautiful brown color.
Sprinkle in:Stir everything together until the meat is perfectly seasoned.
Step 3: Add Cheesy Goodness
Remove the skillet from heat and mix in shredded cheddar cheese, creating a mouthwatering beef mixture.
Step 4: Create Flavor Packages
Take each biscuit dough and gently flatten it out.
Place a spoonful of the beef and cheese mixture right in the center.
Carefully fold the dough over the filling and seal the edges, creating little round parcels.
Step 5: Prepare For Baking
Arrange the stuffed dough balls on a baking sheet with the sealed side facing down.
Step 6: Butter And Cheese Topping
Brush the tops of the balls with melted butter and generously sprinkle grated parmesan cheese all over.
Step 7: Bake To Golden Perfection
Slide the baking sheet into the preheated oven and bake for 12-15 minutes until the bombs turn a gorgeous golden brown.
Step 8: Serve And Enjoy
Optional: Garnish with fresh chopped parsley.
Serve these hot cheeseburger bombs immediately and watch everyone’s eyes light up!
Tips for Cheeseburger Bombs With Garlic Parmesan Perfection
Reheat Cheeseburger Bombs Crispy And Cheesy
What to Plate Next to Garlic Parmesan Cheeseburger Bombs
Pair Perfectly with Garlic Parmesan Cheeseburger Bombs:Cheeseburger Bombs with Garlic Parmesan Finishing Touches
FAQs
Yes, ground turkey or chicken works great as alternatives to beef, giving you flexibility and different flavor profiles.
Absolutely! You can assemble the bombs earlier and refrigerate them, then bake when ready to serve. Just add 2-3 extra minutes to baking time.
Ensure edges are tightly sealed by pinching and pressing the biscuit dough completely around the meat mixture. Avoid overfilling to help maintain a good seal.
Yes, you can freeze them before baking. Assemble completely, place on a baking sheet, freeze until solid, then transfer to a freezer bag. Bake directly from frozen, adding 5-7 minutes to cooking time.
Print
Homemade Taquitos Recipe
- Total Time: 21 minutes
- Yield: 5 1x
Description
Crispy Mexican Golden Roll taquitos pack serious flavor into each hand-rolled bite of cheesy chicken goodness. Crunchy corn tortillas cradle savory fillings, promising a delightful appetizer you’ll crave again and again.
Ingredients
Main Ingredients:
- 2 cups shredded rotisserie chicken
- 10 small corn tortillas
- 1 cup Mexican cheese blend
Spices and Seasonings:
- 1 teaspoon cumin
- 1 teaspoon chili powder
- 1 teaspoon garlic powder
Cooking and Serving Ingredients:
- 1/2 cup (120 milliliters) vegetable oil (for frying)
- 1/2 cup (120 milliliters) sour cream (for serving)
- 1/2 cup (120 milliliters) salsa (for serving)
Instructions
- Warm the oven to 400F and prepare a parchment-lined baking sheet for crispy taquitos.
- Combine shredded chicken with aromatic spices and half the cheese, mixing thoroughly to create a flavorful filling.
- Lay out tortillas and distribute the chicken mixture near one edge, carefully rolling each tortilla tightly and securing the edges to prevent filling from escaping.
- Pour vegetable oil into a skillet, heating to medium temperature for even frying.
- Carefully place rolled taquitos seam-side down into the hot oil, rotating to achieve a uniform golden-brown exterior, approximately 3 minutes per side.
- Transfer crispy taquitos onto the prepared baking sheet, generously sprinkle remaining cheese across the surface.
- Slide the baking sheet into the preheated oven, allowing cheese to melt and taquitos to achieve maximum crispiness for 5 minutes.
- Remove from oven and plate immediately, accompanying with fresh salsa and cool sour cream for a delightful dipping experience.
Notes
- Prevent tortilla cracking by warming them slightly in the microwave or on a skillet before rolling, which makes them more pliable and less likely to break.
- Opt for corn tortillas for a more authentic flavor and crispier texture compared to flour tortillas, ensuring a traditional Mexican street food experience.
- Experiment with protein variations like shredded beef, pulled pork, or black beans to accommodate different dietary preferences and keep the recipe versatile.
- Control oil temperature when frying by using a kitchen thermometer, maintaining around 350-375°F to achieve perfectly golden, crispy taquitos without absorbing excess oil.
- Prep Time: 10 minutes
- Cook Time: 11 minutes
- Category: Lunch, Dinner, Appetizer, Snacks
- Method: Baking
- Cuisine: Mexican
Nutrition
- Serving Size: 5
- Calories: 450
- Sugar: 2g
- Sodium: 600mg
- Fat: 30g
- Saturated Fat: 10g
- Unsaturated Fat: 15g
- Trans Fat: 0g
- Carbohydrates: 35g
- Fiber: 3g
- Protein: 18g
- Cholesterol: 70mg
Clara Thompson
Recipe Developer & Culinary Educator
Expertise
Developing accessible single-serving recipes, Food writing and content creation, Plant-based and allergen-friendly cooking, Culinary education and workshop facilitation
Education
Oregon Culinary Institute (Portland, OR)
Diploma in Culinary Arts
Specialized in plant-based cooking and sustainable kitchen practices.
Portland Community College
Certificate in Food Writing and Media
Focused on recipe writing, food photography, and digital content creation.
Clara’s food journey began with a curiosity for color, texture, and ingredients pulled straight from the garden. Her background in plant-forward cooking and creative writing gives her a unique edge – she makes healthy, flavorful food feel inviting, not intimidating.
She specializes in meals that work for busy lives and different diets, all without sacrificing taste. Clara’s voice comes through in every recipe she writes – clear, kind, and encouraging.