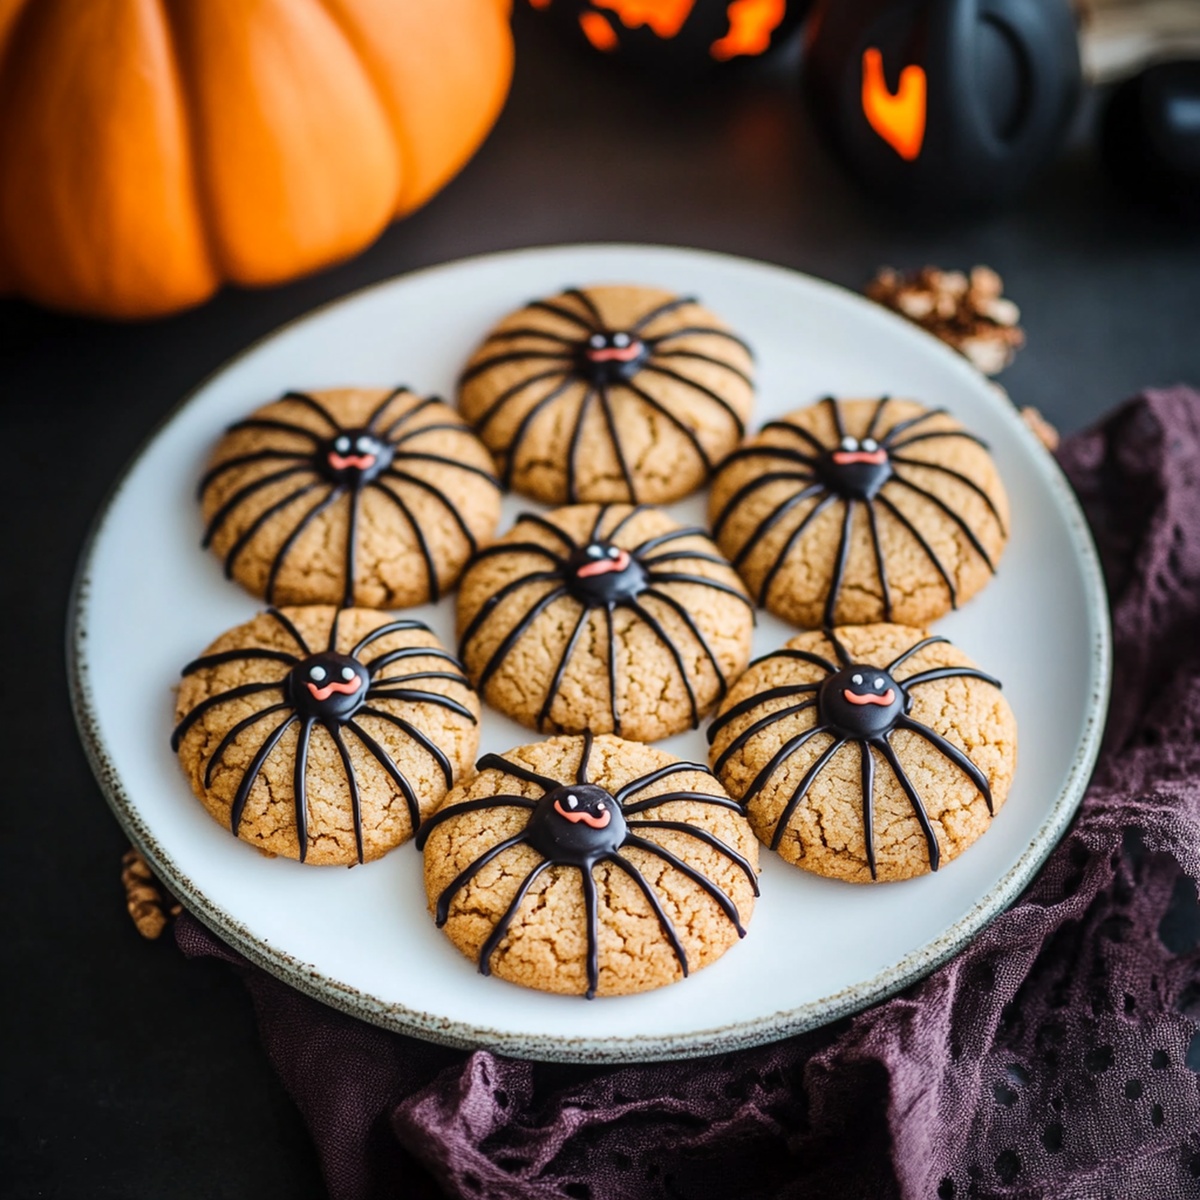
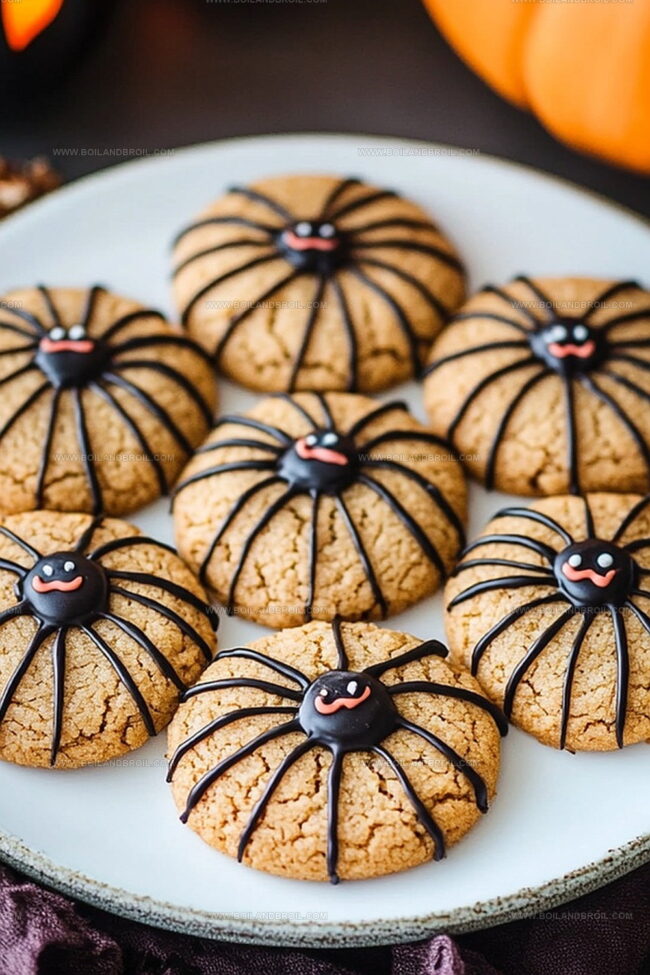
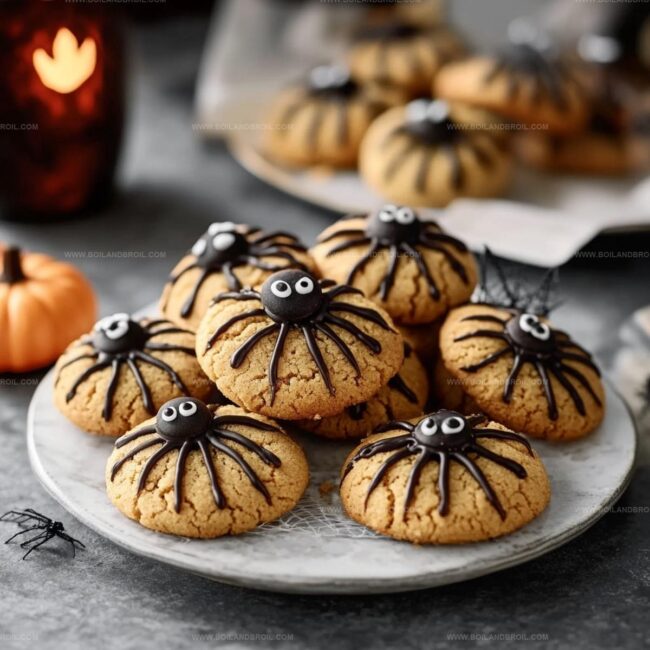
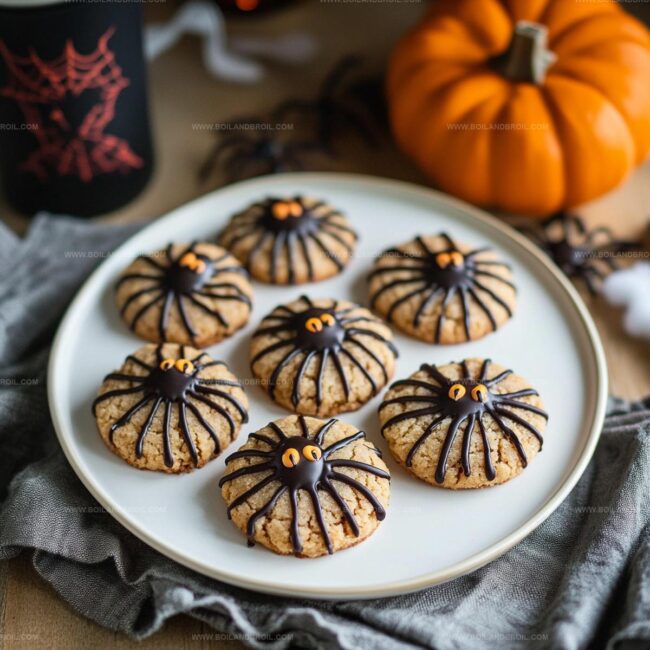
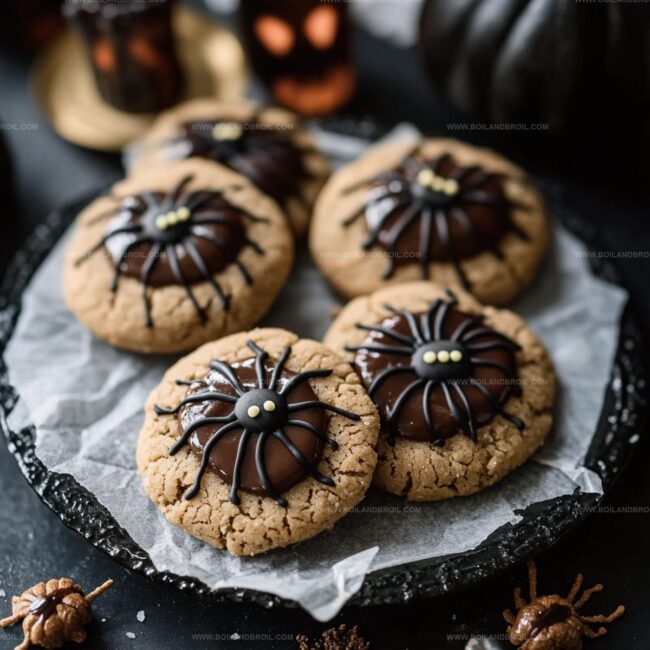
Crafting these whimsical Halloween spider cookies promises a delightful adventure in festive baking.
Webs of chocolate and playful legs transform ordinary cookies into creepy-cute edible art.
Tiny guests and grown-ups alike will squeal with delight at these eight-legged confections.
Chocolate chips and creative decorating techniques turn simple sugar cookies into spooky masterpieces.
Kids can join the fun, carefully placing candy eyes and piping frosting legs.
Dark chocolate becomes the perfect medium for creating spine-tingling cookie creatures.
These sweet treats will spark imagination and bring Halloween magic right to your plate – so grab your apron and let the spooky baking begin!
Halloween Spider Cookies Breakdown
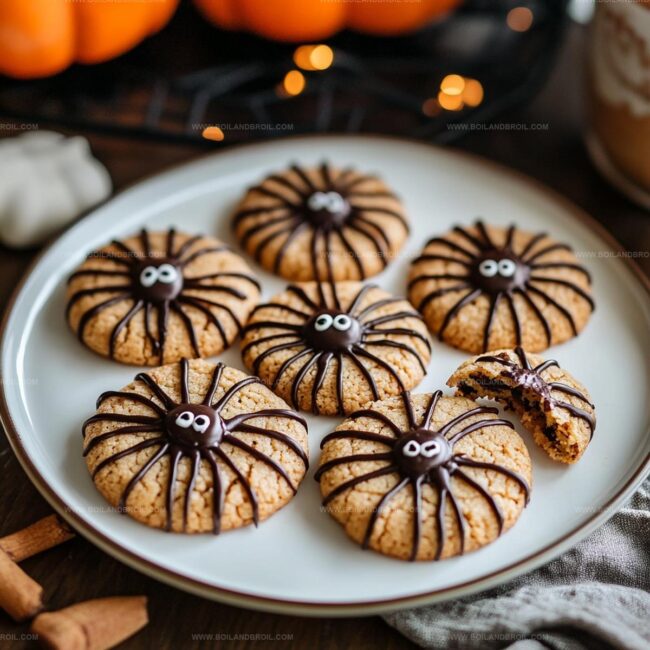
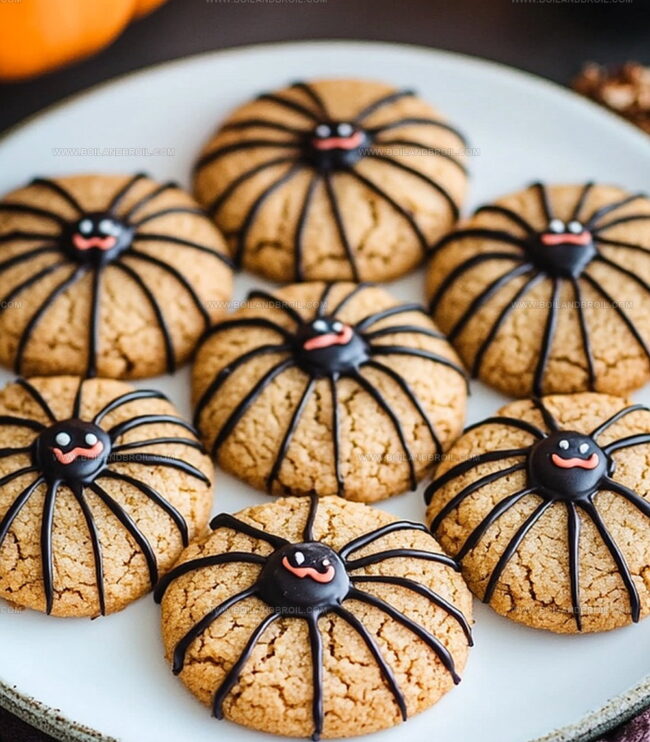
Craft adorable Halloween-themed cookies that will delight kids and adults with their playful spider design.
Engage children in a fun decorating activity that encourages creativity and builds excitement for the holiday celebration.
Combine the rich chocolate flavor of cookies with the sweet peanut butter cup center, making these treats irresistible for all ages.
Ingredients for Halloween Spider Cookies
Base Ingredients:
Flour: The main dry ingredient that provides structure to the cookies.
Cocoa Powder: Gives the cookies a rich chocolate flavor and dark color.
Butter: Adds richness and helps create a soft, tender cookie texture.
Granulated Sugar: Provides sweetness and helps with cookie browning.
Brown Sugar: Adds moisture and depth of flavor to the cookies.
Binding Ingredients:
Egg: Helps bind the ingredients together and adds structure.
Vanilla Extract: Enhances the overall flavor of the cookies.
Leavening and Seasoning Ingredients:
Baking Soda: Helps the cookies rise and spread during baking.
Salt: Balances the sweetness and enhances the overall flavor.
Spider Decoration Ingredients:
Mini Peanut Butter Cups, Candy Eyes, Chocolate Frosting or Melted Chocolate: Create the spider design and add a fun Halloween touch to the cookies.
Making Halloween Spider Cookies
Step 1: Warm Up the Oven
Crank your oven to a toasty 350F (175C).
Grab a baking sheet and line it with parchment paper, creating a perfect stage for your creepy-crawly treats.
Step 2: Mix the Dry Ingredients
In a mixing bowl, whisk together these dry buddies:
Flour
Cocoa powder
Baking soda
Salt
Step 3: Cream the Wet Ingredients
In another bowl, beat these ingredients until they’re smooth and dreamy:
Butter
Granulated sugar
Brown sugar
Add the egg and vanilla extract, then whip until everything looks silky and inviting.
Step 4: Create the Dough
Slowly fold the dry ingredients into the wet mixture.
Keep mixing until a soft, tempting dough emerges.
Step 5: Shape the Cookie Monsters
Scoop out small dough balls and place them on the prepared baking sheet.
Give each one a gentle press with your palm to flatten slightly.
Step 6: Bake to Perfection
Pop the baking sheet into the oven and bake for 8-10 minutes.
The cookies should look set and smell heavenly.
Pull them out and let them cool just a bit.
Step 7: Add the Spider Bodies
While the cookies are still warm, gently press a mini peanut butter cup into the center of each cookie.
Let them cool completely so the candy sticks like spider silk.
Step 8: Spin the Spider Legs
Once the cookies are cool, grab some melted chocolate or chocolate frosting.
Carefully pipe 8 spider legs around each peanut butter cup.
Step 9: Give Them Eyes
Use a tiny bit of melted chocolate to attach two candy eyes to each spider, bringing your creepy-crawly cookies to life.
Step 10: Serve the Spooky Treats
Let the chocolate set completely, then serve up these wickedly delicious Halloween spider cookies that are sure to delight and frighten!
Recipe Tips for Spider Cookies
Bring butter to room temperature by leaving it out for 30-45 minutes before mixing to ensure smooth, creamy cookie dough.
Chill the dough for 15-20 minutes before shaping to make it easier to handle and prevent spreading during baking.
Use a cookie scoop or tablespoon for consistent cookie sizes, ensuring even baking and professional-looking results.
Use a piping bag or zip-lock bag with a small corner snipped off for precise, thin spider leg designs on each cookie.
Gently press candy eyes into the melted chocolate while it’s still warm to ensure they stick perfectly to the peanut butter cup spider body.
Storing Halloween Spider Cookies
Store cookies in an airtight container between layers of parchment paper for up to 5 days in the refrigerator, keeping their shape and texture perfect.
Wrap cookies individually in plastic wrap, place in freezer-safe container, and freeze for up to 3 months, ensuring maximum freshness and taste.
Keep cookies in sealed container at room temperature for 2-3 days, away from direct sunlight or heat sources to maintain crispness.
Warm cookies gently in microwave for 10-15 seconds or place in preheated oven at 300F for 2-3 minutes to restore softness and enhance chocolate flavor.
Serving Spider Cookies with Fun Additions
Pair with Creepy Cocoa Milkshake: Blend chocolate ice cream, milk, and cocoa powder for a rich, dark drink that matches the cookies’ chocolatey theme and Halloween spirit.
Complement with Pumpkin Spice Latte: Brew a warm, spicy latte with espresso, pumpkin puree, and cinnamon to balance the sweet and rich cookie flavors while capturing seasonal warmth.
Serve alongside Caramel Apple Cider: Mix hot apple cider with caramel syrup and a cinnamon stick for a festive beverage that provides a tart contrast to the chocolate cookies.
Match with Midnight Mocha: Create a decadent coffee drink using dark roast espresso, chocolate syrup, and a touch of black food coloring for an extra spooky Halloween presentation.
Cookie Variations for Halloween Spider Treats
Gluten-Free Spider Cookies: Replace wheat flour with almond or gluten-free blend flour. Use certified gluten-free cocoa powder and ensure all ingredients are gluten-free.
Vegan Spider Cookies: Swap butter with coconut oil or vegan margarine. Use flax egg instead of regular egg. Replace peanut butter cups with dark chocolate rounds or vegan chocolate cups.
Nut-Free Halloween Cookies: Substitute peanut butter cups with sunflower seed butter cups or chocolate-covered sunflower seeds. Use seed-based alternatives for decorations to avoid nut allergens.
Low-Sugar Spider Cookies: Use monk fruit sweetener or stevia instead of granulated sugar. Select sugar-free chocolate for decorating legs and eyes. Reduce overall sugar content while maintaining delicious Halloween spirit.
FAQs
Can I make these cookies ahead of time?
Yes, you can prepare the cookie dough in advance and refrigerate it for up to 3 days before baking. Just bring the dough to room temperature before shaping and baking.
Are these cookies kid-friendly to make?
Absolutely! Kids will love helping decorate the spider legs and adding the candy eyes. It’s a fun and easy Halloween baking project that children can enjoy.
What if I don’t have peanut butter cups?
You can substitute with chocolate kisses, Rolos, or any round chocolate candy that works as the spider’s body. Just make sure to press it into the warm cookie so it sticks.
How do I prevent the chocolate from getting messy when piping spider legs?
Use a small piping bag or a ziplock bag with a tiny corner cut off. Ensure the chocolate is slightly cooled but still fluid to create neat, precise spider legs.
Developing accessible single-serving recipes, Food writing and content creation, Plant-based and allergen-friendly cooking, Culinary education and workshop facilitation
Education
Oregon Culinary Institute (Portland, OR) Diploma in Culinary Arts
Specialized in plant-based cooking and sustainable kitchen practices.
Portland Community College Certificate in Food Writing and Media
Focused on recipe writing, food photography, and digital content creation.
Clara’s food journey began with a curiosity for color, texture, and ingredients pulled straight from the garden. Her background in plant-forward cooking and creative writing gives her a unique edge – she makes healthy, flavorful food feel inviting, not intimidating.
She specializes in meals that work for busy lives and different diets, all without sacrificing taste. Clara’s voice comes through in every recipe she writes – clear, kind, and encouraging.


Clara Thompson
Recipe Developer & Culinary Educator
Expertise
Developing accessible single-serving recipes, Food writing and content creation, Plant-based and allergen-friendly cooking, Culinary education and workshop facilitation
Education
Oregon Culinary Institute (Portland, OR)
Diploma in Culinary Arts
Specialized in plant-based cooking and sustainable kitchen practices.
Portland Community College
Certificate in Food Writing and Media
Focused on recipe writing, food photography, and digital content creation.
Clara’s food journey began with a curiosity for color, texture, and ingredients pulled straight from the garden. Her background in plant-forward cooking and creative writing gives her a unique edge – she makes healthy, flavorful food feel inviting, not intimidating.
She specializes in meals that work for busy lives and different diets, all without sacrificing taste. Clara’s voice comes through in every recipe she writes – clear, kind, and encouraging.