
Heavenly Kings Hawaiian Cheesecake Danish Recipe for Brunch Joy
Kings Hawaiian cheesecake danish whispers sweet promises of indulgence right from your kitchen counter.
Soft, pillowy pastry wraps around creamy filling like a warm embrace.
Delicate layers promise pure comfort with every single bite.
Buttery richness melts across your palate, creating moments of pure culinary joy.
Hawaiian rolls provide an unexpected twist to classic danish traditions.
Unexpected ingredients dance together, creating magic on your plate.
Savor each delectable morsel and let dessert become your delightful adventure.
Kings Hawaiian Cheesecake Danish: Why It’s a Treat
Everything Needed for Cheesecake Danish
Bread Base:Dairy and Cream Mixture:Finishing Touches:Baking Essentials:Easy Steps to a Cheesecake Danish
Step 1: Warm Up the Oven
Set your oven to 350F (175C) and lightly coat a baking dish with cooking spray or butter to prevent sticking.
Step 2: Slice Hawaiian Rolls
Carefully cut each Kings Hawaiian roll in half horizontally, placing the halves cut-side up in the prepared baking dish.
Step 3: Whip Up Creamy Filling
In a mixing bowl, blend together:Whisk these ingredients until the mixture becomes smooth and silky with no lumps.
Step 4: Spread the Delicious Mixture
Generously distribute the cream cheese blend across each roll half, ensuring an even coating that covers the entire surface.
Step 5: Bake to Perfection
Place the baking dish in the preheated oven and bake for 25-30 minutes.
Watch for a beautiful golden brown color and a set center that indicates the danish is fully cooked.
Step 6: Finish and Serve
Let the danish cool for a few minutes, then dust with a light sprinkle of powdered sugar.
Slice and serve while still warm for the most delightful experience.
Tricks for Cheesecake Danish Lovers
Keeping Cheesecake Danish Just Right
What Goes with Cheesecake Danish
Danish – Creative Takes and Flavors
FAQs
Kings Hawaiian rolls are soft, sweet Hawaiian-style bread rolls known for their unique flavor and tender texture. They provide a perfect base for this cheesecake danish, adding a subtle sweetness that complements the creamy filling.
Yes, standard cream cheese works perfectly. Just ensure it’s softened at room temperature for smooth mixing. Full-fat cream cheese will give the best flavor and texture for this danish.
Look for a golden-brown top and a set center that doesn’t jiggle when gently shaken. The edges should be slightly puffed and the cream cheese mixture should look firm but not dry.
Absolutely! This recipe is incredibly simple and requires minimal baking skills. With just a few basic steps, even beginners can create a delicious dessert that looks and tastes impressive.
Print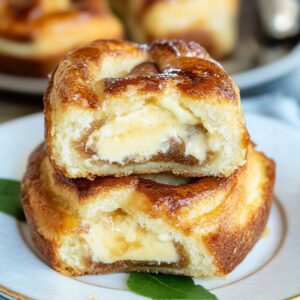
Kings Hawaiian Cheesecake Danish Recipe
- Total Time: 40 minutes
- Yield: 8 1x
Description
Delightful Kings Hawaiian Cheesecake Danish combines creamy cheesecake with sweet pastry for an irresistible breakfast treat. Pillowy Danish pastry and rich cream cheese filling promise a luxurious morning indulgence you won’t want to miss.
Ingredients
Cheesecake Filling:
- 8 ounces (226 grams) cream cheese, softened
- 1/2 cup (100 grams) granulated sugar
- 1 teaspoon vanilla extract
- 2 large eggs, room temperature
Base:
- 6 Kings Hawaiian Sweet Rolls
Topping:
- Powdered sugar
Instructions
- Warm the oven to 350F (175C) and apply a light cooking spray to the baking dish to prevent sticking.
- Carefully slice each Kings Hawaiian roll into two even halves, positioning them cut-side facing upward in the prepared dish.
- Create a silky cream cheese filling by whisking together softened cream cheese, sugar, vanilla extract, and eggs until the mixture achieves a smooth, uniform consistency.
- Generously distribute the cream cheese mixture across each roll half, ensuring an even layer that covers the entire surface.
- Transfer the prepared dish to the preheated oven and bake for 25-30 minutes, watching for a golden-brown color and a set center that indicates complete cooking.
- Remove from the oven and allow the danish to rest and slightly cool for a few minutes.
- Finish by delicately dusting the top with a light coating of powdered sugar, creating an elegant and appetizing presentation before serving.
Notes
- Slice rolls carefully to maintain their soft, pillowy texture for an even base.
- Use room temperature cream cheese to ensure a silky smooth filling without lumps.
- Adjust sugar levels to create a less sweet version or use alternative sweeteners like stevia for diabetic-friendly options.
- Enhance flavor by adding a sprinkle of cinnamon or lemon zest to the cream cheese mixture for a delightful twist.
- Prep Time: 10 minutes
- Cook Time: 30 minutes
- Category: Desserts, Snacks
- Method: Baking
- Cuisine: Hawaiian
Nutrition
- Serving Size: 8
- Calories: 210
- Sugar: 14 g
- Sodium: 150 mg
- Fat: 10 g
- Saturated Fat: 5 g
- Unsaturated Fat: 3 g
- Trans Fat: 0 g
- Carbohydrates: 25 g
- Fiber: 1 g
- Protein: 4 g
- Cholesterol: 70 mg
Jack Sullivan
Founder & Culinary Storyteller
Expertise
Single-recipe development with a narrative approach, Culinary storytelling and food history, Seasonal and regional ingredient utilization, Home cooking techniques adapted for modern kitchens
Education
New England Culinary Institute (Montpelier, VT)
Certificate in Culinary Arts
Focused on farm-to-table cooking, sustainable practices, and modern plating techniques.
Asheville-Buncombe Technical Community College
Associate Degree in Culinary Arts
Emphasized Southern Appalachian cuisine and local ingredient sourcing.
Jack grew up surrounded by smoky skillets and handwritten recipes in the mountains of North Carolina. His roots in Appalachian cooking shaped the way he sees food – as something that connects people, tells a story, and holds meaning.
With hands-on training and a background in sustainable, regional cooking, Jack started Boil And Broil to make meaningful meals more accessible. He’s all about one-dish recipes that are simple to follow but rich with flavor and history.