
Adorable Mini Bunny Cupcakes Recipe: Hop Into Sweet Baking Fun
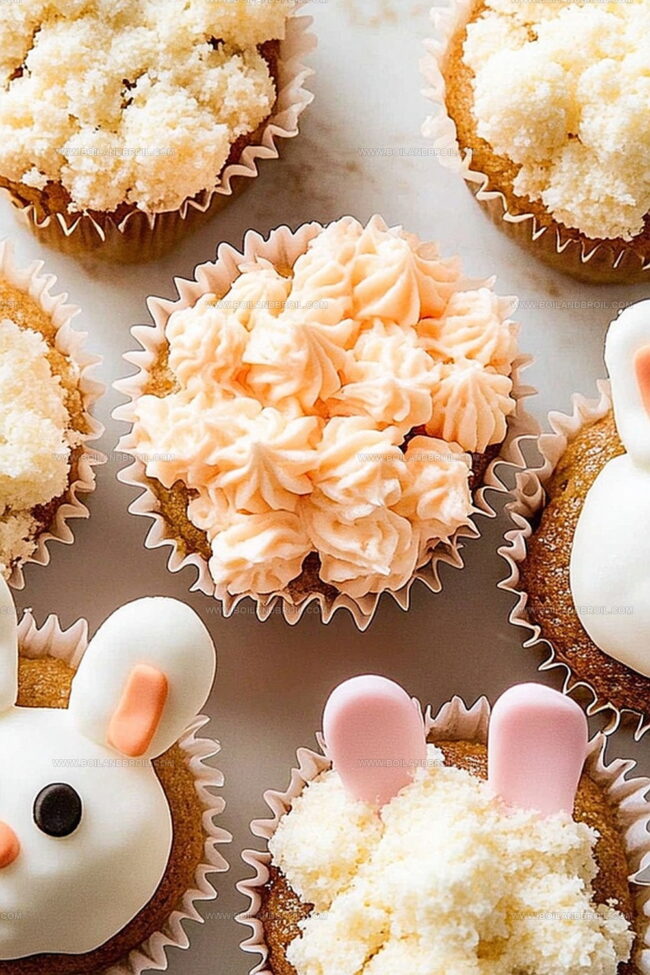
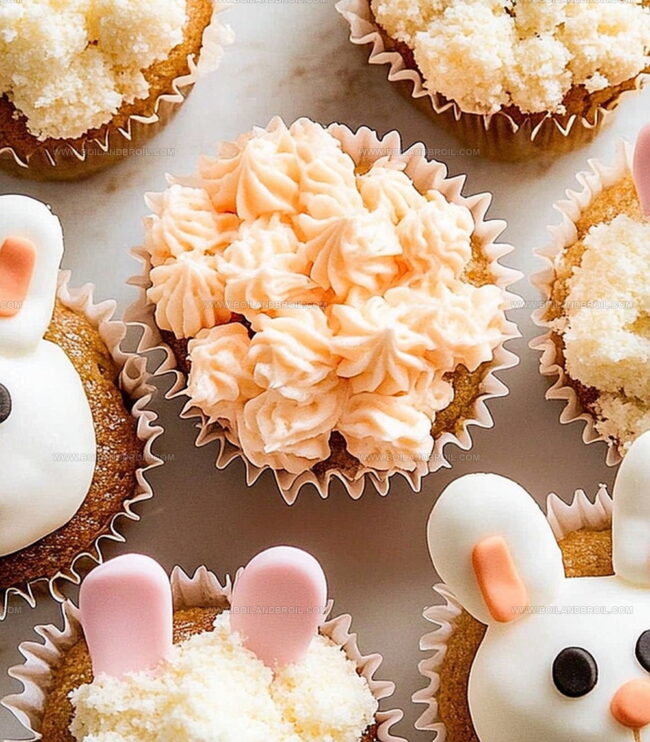
Adorable mini bunny cupcakes bring whimsy and charm to any celebration with their playful design.
Soft vanilla sponge creates the perfect base for these cute desserts.
Sweet marshmallow ears and chocolate chip eyes make these treats irresistible to kids and adults alike.
Pastel frosting adds a delightful touch of springtime magic.
Each bite promises pure delight and nostalgic memories of childhood parties.
Your little guests will squeal with excitement when they see these delectable bunny-themed cupcakes.
Get ready to become the star baker at your next gathering!
Charming Mini Bunny Cupcakes for Spring
Essentials for Baking Mini Bunny Cupcakes
For the Cake Base:Liquid Ingredients:Dry Ingredients:How to Shape and Decorate Bunny Cupcakes
Step 1: Prepare Baking Station
Get your cupcake pan ready by lining it with cute paper liners.
Make sure your oven is warm and cozy at 350°F (175°C).
Step 2: Mix Dry Ingredients
Grab a mixing bowl and whisk together these powdery friends:Blend them until they’re best buddies with no lumpy strangers.
Step 3: Cream Butter and Sugar
In another bowl, beat softened butter and sugar until they transform into a fluffy, cloud-like mixture that looks light and dreamy.
Step 4: Incorporate Wet Ingredients
Add eggs one at a time, mixing thoroughly after each addition.
Pour in vanilla extract for that irresistible aroma and flavor.
Step 5: Combine Wet and Dry Mixtures
Slowly marry your dry ingredients with the wet mixture.
Pour in milk to help everything come together smoothly.
Mix until the batter looks silky and perfect.
Step 6: Fill and Bake Cupcakes
Carefully spoon the batter into your lined cupcake pan, filling each liner about two-thirds full.
Slide the pan into the preheated oven and bake for approximately 20 minutes.
Step 7: Check Cupcake Doneness
Peek into the oven and use a toothpick to test.
If it comes out clean, your cupcakes are ready to party!
Step 8: Cool and Decorate
Let the cupcakes chill completely.
Then go wild decorating them with frosting to create adorable bunny faces and ears.
Tips for Fluffy Cake and Sweet Frosting Ears
Storing and Displaying Mini Bunny Cupcakes
Pairing Suggestions for Bunny Cupcake Delights
Creative Variations on Bunny Cupcake Designs
FAQs
While you can substitute some whole wheat flour, it might make the cupcakes denser. Use a mix of 50% all-purpose and 50% whole wheat flour for best results.
To keep cupcakes moist, avoid overmixing the batter and be careful not to overbake. Check doneness a few minutes before the recommended baking time and remove from oven when a toothpick comes out with just a few moist crumbs.
You can substitute with other flavor extracts like almond or use the same amount of maple syrup. If you have a vanilla bean, scrape the seeds as an alternative to extract.
Yes, replace butter with vegetable oil or coconut oil, and use non-dairy milk like almond or oat milk. Ensure all other ingredients are dairy-free to accommodate dietary needs.
Print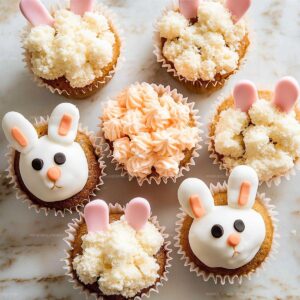
Mini Bunny Cupcakes Recipe
- Total Time: 35 minutes
- Yield: 12 1x
Description
Delightful mini bunny cupcakes bring whimsical charm to dessert tables with adorable Easter-inspired design. Chocolate cake base and fluffy frosting create cute bunny faces that charm children and adults alike, promising sweet memories with each delectable bite.
Ingredients
Main Ingredients:
- 1 1/2 cups all-purpose flour
- 1 cup granulated sugar
- 2 large eggs
- 1/2 cup unsalted butter
Wet Ingredients:
- 1/2 cup milk
- 1 teaspoon vanilla extract
Dry Ingredients:
- 2 teaspoons baking powder
- 1/4 teaspoon salt
Instructions
- Heat oven to 350°F and arrange cupcake liners in a standard muffin tin.
- Combine dry ingredients in a mixing bowl, whisking flour, baking powder, and salt until evenly distributed.
- In a separate large bowl, blend butter and sugar using an electric mixer until creamy and pale.
- Incorporate eggs individually into the butter mixture, adding vanilla extract and mixing thoroughly after each addition.
- Slowly fold dry ingredients into wet mixture, alternating with milk to create a smooth, consistent batter.
- Carefully distribute batter evenly into cupcake liners, filling each approximately two-thirds full.
- Bake for 18-22 minutes, checking doneness with a toothpick inserted into the center that comes out clean.
- Remove cupcakes from oven and let cool completely on a wire rack before applying frosting.
- Decorate cupcakes with desired frosting technique to create bunny-themed designs.
Notes
- Perfectly measure ingredients using kitchen scale for consistent cupcake texture and even baking results.
- Bring butter and eggs to room temperature before mixing to ensure smoother batter and better ingredient integration.
- Avoid overmixing batter to prevent tough, dense cupcakes by stopping when ingredients are just combined.
- Customize recipe for gluten-free diets by substituting all-purpose flour with a reliable gluten-free flour blend, maintaining same measurement proportions.
- Prep Time: 15 minutes
- Cook Time: 20 minutes
- Category: Desserts
- Method: Baking
- Cuisine: American
Nutrition
- Serving Size: 12
- Calories: 150
- Sugar: 10 g
- Sodium: 100 mg
- Fat: 6 g
- Saturated Fat: 3 g
- Unsaturated Fat: 2 g
- Trans Fat: 0 g
- Carbohydrates: 22 g
- Fiber: 0 g
- Protein: 2 g
- Cholesterol: 30 mg
Jack Sullivan
Founder & Culinary Storyteller
Expertise
Single-recipe development with a narrative approach, Culinary storytelling and food history, Seasonal and regional ingredient utilization, Home cooking techniques adapted for modern kitchens
Education
New England Culinary Institute (Montpelier, VT)
Certificate in Culinary Arts
Focused on farm-to-table cooking, sustainable practices, and modern plating techniques.
Asheville-Buncombe Technical Community College
Associate Degree in Culinary Arts
Emphasized Southern Appalachian cuisine and local ingredient sourcing.
Jack grew up surrounded by smoky skillets and handwritten recipes in the mountains of North Carolina. His roots in Appalachian cooking shaped the way he sees food – as something that connects people, tells a story, and holds meaning.
With hands-on training and a background in sustainable, regional cooking, Jack started Boil And Broil to make meaningful meals more accessible. He’s all about one-dish recipes that are simple to follow but rich with flavor and history.