
Simple Mini Oreo Cheesecakes Recipe: Fun Bite-Sized Treats
Creamy and decadent mini Oreo cheesecakes promise a delightful dessert experience that will make your taste buds dance.
These bite-sized treats pack an incredible punch of rich, chocolatey goodness with every single bite.
The classic Oreo cookie provides a perfect crunchy base for the smooth, velvety cheesecake filling that melts in your mouth.
Chocolate lovers rejoice as these mini cheesecakes blend the best of two worlds: the iconic Oreo and the classic cheesecake.
Each miniature dessert offers a perfect balance of textures and flavors that will impress anyone at the table.
The recipe is surprisingly simple to create, requiring just a few basic ingredients and minimal baking skills.
With these adorable mini Oreo cheesecakes, you are about to become the star of any dessert table.
Ingredients for Mini Oreo Cheesecakes
Crust Base:Cheesecake Filling:Topping and Garnish:Additional Ingredients:Mini Oreo Cheesecake Directions
Step 1: Crush Oreo Cookies
Toss whole Oreo cookies into a food processor.
Pulse until they transform into fine, sandy crumbs.
Pour melted butter over the crumbs and pulse again to create a cohesive mixture that holds together when pressed.
Step 2: Prepare Baking Pans
Spray two 12-count mini cheesecake pans with cooking spray.
Take a tablespoon of Oreo crust mixture and press firmly into the bottom of each cavity.
Refrigerate the pans to help the crust set while preparing the filling.
Step 3: Create Cheesecake Base
Using a stand mixer with paddle attachment, blend:Beat until the mixture becomes smooth and creamy.
Add vanilla extract and continue mixing until completely incorporated and no sugar lumps remain.
Step 4: Whip Cream Mixture
Switch to whisk attachment.
Slowly pour heavy cream into the mixture.
Increase mixer speed to high and whip until stiff peaks form (about 20-30 seconds).
Gently fold in chopped Oreo pieces, maintaining the mixture’s light texture.
Step 5: Fill Cheesecake Pans
Transfer the cheesecake mixture to a large piping bag.
Pipe the filling into prepared pan cavities, filling them to the top.
Smooth the surfaces with a small offset spatula.
Refrigerate for 8 hours or overnight to set completely.
Step 6: Remove Cheesecakes
Carefully push each cheesecake out of the pan from the bottom.
Remove the metal bases, preparing them for final touches.
Step 7: Prepare Chocolate Ganache
Combine chopped dark chocolate and heavy cream in a microwave-safe bowl.
Heat in 20-second intervals, stirring between each burst.
Mix until the ganache becomes smooth and glossy.
Spoon over the chilled cheesecakes.
Step 8: Garnish and Serve
Pipe whipped cream on top of each cheesecake.
Place a mini Oreo cookie as a decorative garnish.
Serve chilled and enjoy the delightful treat!
Smart Mini Cheesecake Tips
Keep Mini Oreo Cheesecakes Fresh
What Pairs with Mini Oreo Cheesecakes
Oreo Cheesecake Flavor Options
FAQs
Yes, Oreo cookies are essential for both the crust and filling. You’ll use whole Oreo cookies (including the cream center) to create the crust and chopped Oreos to mix into the cheesecake filling.
While a stand mixer makes the process easier, you can use a hand mixer or even mix by hand. Just ensure the cream cheese is fully softened and you whip the cream carefully to achieve stiff peaks.
The filling is ready when it’s smooth and creamy with no visible powdered sugar lumps. When you add heavy cream and whip, you should see stiff peaks form in about 20-30 seconds.
You’ll need mini cheesecake pans with removable bottoms, a food processor for the crust, and a piping bag for neat filling. If you don’t have mini cheesecake pans, a muffin tin with liners can work as an alternative.
Mini Oreo Cheesecake Recipe Highlights
Print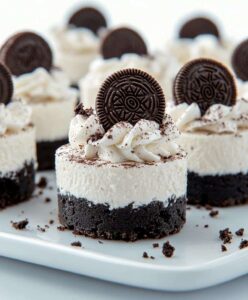
Mini Oreo Cheesecakes Recipe
- Total Time: 8 hours 20 minutes
- Yield: 12 1x
Description
Creamy mini oreo cheesecakes bring delightful layers of indulgence to dessert lovers. Chocolate cookie crusts and smooth cream cheese filling create an irresistible treat you’ll want to savor with friends and family.
Ingredients
Main Ingredients:
- 24 ounces (681 grams) cream cheese
- 18 Oreos
- 12 Oreos, roughly chopped or crushed
- 24 mini Oreos
Binding and Sweetening Ingredients:
- 2 cups (230 grams) powdered sugar
- 4 tablespoons (56 grams) butter, melted
- 1 tablespoon vanilla extract
Topping and Garnish Ingredients:
- 1 1/2 cups (360 milliliters) heavy cream
- 1/3 cup (84 grams) dark chocolate, chopped
- 1/3 cup (84 grams) heavy cream
- whipped cream
Instructions
- Pulverize whole Oreo cookies in a food processor until they reach a fine, sandy consistency. Drizzle melted butter and pulse until thoroughly combined, creating a cohesive crumbly mixture.
- Lightly coat mini cheesecake pans with cooking spray. Distribute approximately one tablespoon of Oreo crust mixture into each pan cavity, pressing firmly to create a compact base. Refrigerate the pans to solidify the crust while preparing subsequent components.
- Using a stand mixer with paddle attachment, blend cream cheese and powdered sugar until achieving a silky, lump-free texture. Incorporate vanilla extract, mixing until the filling becomes uniformly smooth and creamy.
- Switch to whisk attachment and gradually introduce heavy cream on low speed. Increase mixer speed to high, whipping until stiff peaks form within 20-30 seconds. Gently fold chopped Oreos into the mixture, maintaining its airy consistency.
- Transfer cheesecake filling to a large piping bag. Carefully pipe mixture into prepared pans, filling to the brim. Smooth tops using an offset spatula for a polished appearance. Refrigerate for 8 hours or overnight to set completely.
- After chilling, carefully release cheesecakes from pans by pushing upward from the bottom. Remove metal bases, preparing for final embellishments.
- Create chocolate ganache by combining chopped dark chocolate and heavy cream in a microwave-safe bowl. Heat in 20-second intervals, stirring between each to ensure even melting. Once smooth, drizzle ganache over each cheesecake.
- Add a decorative swirl of whipped cream atop each cheesecake. Garnish with a miniature Oreo cookie for an elegant finishing touch. Serve chilled and enjoy the decadent treat.
Notes
- Pulse Oreos until they reach a fine, sandy texture to ensure a compact and flavorful base that holds together perfectly.
- Chill the crust before adding filling to help it set and prevent crumbling when removing from the pan.
- Use a whisk attachment for the cream to achieve stiff peaks, which gives the cheesecake its light and airy texture.
- Incorporate chopped Oreos gently to maintain the mixture’s fluffy consistency and prevent deflating the whipped cream.
- These mini cheesecakes can be prepared a day in advance, making them ideal for parties or gatherings.
- Prep Time: 20 minutes
- Cook Time: 8 hours
- Category: Desserts
- Method: Chilling
- Cuisine: American
Nutrition
- Serving Size: 12
- Calories: 364
- Sugar: 25g
- Sodium: 200mg
- Fat: 26g
- Saturated Fat: 15g
- Unsaturated Fat: 9g
- Trans Fat: 0g
- Carbohydrates: 30g
- Fiber: 1g
- Protein: 4g
- Cholesterol: 75mg
Clara Thompson
Recipe Developer & Culinary Educator
Expertise
Developing accessible single-serving recipes, Food writing and content creation, Plant-based and allergen-friendly cooking, Culinary education and workshop facilitation
Education
Oregon Culinary Institute (Portland, OR)
Diploma in Culinary Arts
Specialized in plant-based cooking and sustainable kitchen practices.
Portland Community College
Certificate in Food Writing and Media
Focused on recipe writing, food photography, and digital content creation.
Clara’s food journey began with a curiosity for color, texture, and ingredients pulled straight from the garden. Her background in plant-forward cooking and creative writing gives her a unique edge – she makes healthy, flavorful food feel inviting, not intimidating.
She specializes in meals that work for busy lives and different diets, all without sacrificing taste. Clara’s voice comes through in every recipe she writes – clear, kind, and encouraging.