
Irresistible Peanut Butter Cookie Dough Bars Recipe for Sweeties
Creamy peanut butter cookie dough bars offer a delightful twist on classic dessert indulgences.
Sweet secrets hide within each delectable layer of this irresistible treat.
Childhood memories dance across taste buds when you bite into these smooth, rich squares.
Minimal ingredients combine to create maximum flavor in this simple yet sophisticated recipe.
Rich chocolate chips peek through soft, decadent dough that melts effortlessly on your tongue.
Unexpected textures and deep nutty notes make these bars a perfect companion for afternoon coffee or late-night cravings.
You’ll want to savor every single bite of this mouthwatering confection.
Peanut Butter Cookie Dough Bars: Reasons to Make Them Today
What You Need for Peanut Butter Cookie Dough Bars
Base Ingredients:Flour Mixture:Flavor Enhancers:Simple Steps for Peanut Butter Cookie Dough Bars
Step 1: Prepare Baking Station
Set your oven to 350F (175C).
Line an 8×8-inch baking dish with parchment paper, allowing slight overhang for easy removal later.
Step 2: Create Creamy Base
In a large mixing bowl, combine:Blend ingredients until smooth and creamy, using an electric mixer or strong whisk.
Step 3: Sweeten the Mixture
Add to the creamy base:Beat thoroughly for about 2 minutes until the mixture becomes light and fluffy.
Step 4: Enhance Flavor Profile
Pour in vanilla extract and mix until completely incorporated, creating a rich aromatic base.
Step 5: Incorporate Dry Ingredients
In a separate bowl, whisk together flour and a pinch of salt.
Gradually fold dry ingredients into the wet mixture, stirring gently to maintain a soft texture.
Step 6: Add Chocolate Decadence
Gently fold chocolate chips into the dough, ensuring even distribution throughout the mixture.
Step 7: Bake to Perfection
Spread the cookie dough evenly into the prepared baking dish.
Bake for 25-30 minutes until the top turns golden brown and edges look slightly crisp.
Step 8: Cool and Slice
Remove from oven and let the bars cool completely in the baking dish.
Once cooled, lift out using parchment paper and slice into square servings.
Handy Tips for Chewy Peanut Butter Cookie Dough Bars
Storing and Reheating Cookie Dough Bars the Easy Way
Pairing Suggestions for Peanut Butter Cookie Dough Bars
New Twists on Classic Peanut Butter Cookie Dough Bars
FAQs
Yes, the flour is baked in the oven, which kills any potential bacteria, making the bars completely safe to consume.
Natural peanut butter can work, but it might change the texture. Opt for a smooth, creamy variety with minimal oil separation for best results.
Look for golden brown edges and a slightly firm center. A toothpick inserted in the middle should come out with a few moist crumbs.
You can substitute the all-purpose flour with a gluten-free flour blend, but the texture might be slightly different from the original recipe.
Print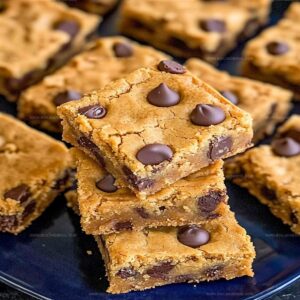
Peanut Butter Cookie Dough Bars Recipe
- Total Time: 45 minutes
- Yield: 16 1x
Description
Sinful peanut butter cookie dough bars blend creamy indulgence with nostalgic comfort, promising a delightful escape from ordinary desserts. Chocolate drizzle and smooth layers invite dessert enthusiasts to savor each rich, irresistible bite.
Ingredients
Main Ingredients:
- 1 cup (240 ml) creamy peanut butter
- 1/2 cup (115 g) unsalted butter, softened
- 1 3/4 cups (220 g) all-purpose flour
Sweeteners:
- 1/2 cup (100 g) light brown sugar
- 1/4 cup (50 g) granulated sugar
Flavor Enhancers and Extras:
- 1 teaspoon vanilla extract
- 1 cup (170 g) semi-sweet chocolate chips
Instructions
- Prepare the baking vessel by lining an 8-inch square pan with parchment paper, ensuring complete coverage for easy removal.
- Cream together peanut butter and softened butter in a spacious mixing bowl until smooth and uniform in texture.
- Incorporate brown and granulated sugars, vigorously mixing for approximately 2 minutes to create a light, airy consistency.
- Introduce vanilla extract, blending thoroughly to infuse the mixture with rich, aromatic flavor.
- In a separate container, combine flour and salt, whisking to eliminate any potential lumps.
- Gradually fold the dry ingredients into the wet mixture, stirring gently to maintain a delicate texture.
- Gently fold chocolate chips throughout the dough, ensuring even distribution for consistent flavor in every bite.
- Transfer the prepared mixture into the lined baking pan, spreading evenly with a spatula.
- Bake in a preheated 350°F (175°C) oven for 25-30 minutes, watching for a golden-brown surface indicating perfect doneness.
- Remove from oven and allow to cool completely at room temperature for at least 1 hour.
- Once cooled, use parchment paper to lift the entire batch from the pan and slice into precise, uniform squares.
Notes
- Chill the dough for 15 minutes before spreading in the pan to prevent spreading and maintain a thick, chewy texture.
- Swap traditional flour with gluten-free flour blend for a celiac-friendly version without compromising taste or texture.
- Use dark chocolate chips for a richer flavor profile or mix in chopped nuts for extra crunch and depth.
- Line the baking dish with overhanging parchment paper for easy removal and clean cutting of bars.
- Prep Time: 15 minutes
- Cook Time: 30 minutes
- Category: Desserts, Snacks
- Method: Baking
- Cuisine: American
Nutrition
- Serving Size: 16
- Calories: 210
- Sugar: 9 g
- Sodium: 70 mg
- Fat: 10 g
- Saturated Fat: 4 g
- Unsaturated Fat: 5 g
- Trans Fat: 0 g
- Carbohydrates: 29 g
- Fiber: 1 g
- Protein: 4 g
- Cholesterol: 15 mg
Jack Sullivan
Founder & Culinary Storyteller
Expertise
Single-recipe development with a narrative approach, Culinary storytelling and food history, Seasonal and regional ingredient utilization, Home cooking techniques adapted for modern kitchens
Education
New England Culinary Institute (Montpelier, VT)
Certificate in Culinary Arts
Focused on farm-to-table cooking, sustainable practices, and modern plating techniques.
Asheville-Buncombe Technical Community College
Associate Degree in Culinary Arts
Emphasized Southern Appalachian cuisine and local ingredient sourcing.
Jack grew up surrounded by smoky skillets and handwritten recipes in the mountains of North Carolina. His roots in Appalachian cooking shaped the way he sees food – as something that connects people, tells a story, and holds meaning.
With hands-on training and a background in sustainable, regional cooking, Jack started Boil And Broil to make meaningful meals more accessible. He’s all about one-dish recipes that are simple to follow but rich with flavor and history.