
Chill Out with a No-Bake Strawberry Icebox Cake Recipe
Sweet summer memories come flooding back with this classic strawberry icebox cake that blends creamy layers and fresh fruit into a delightful dessert.
Cool and effortless, this no-bake treat requires minimal kitchen skills and maximum flavor enjoyment.
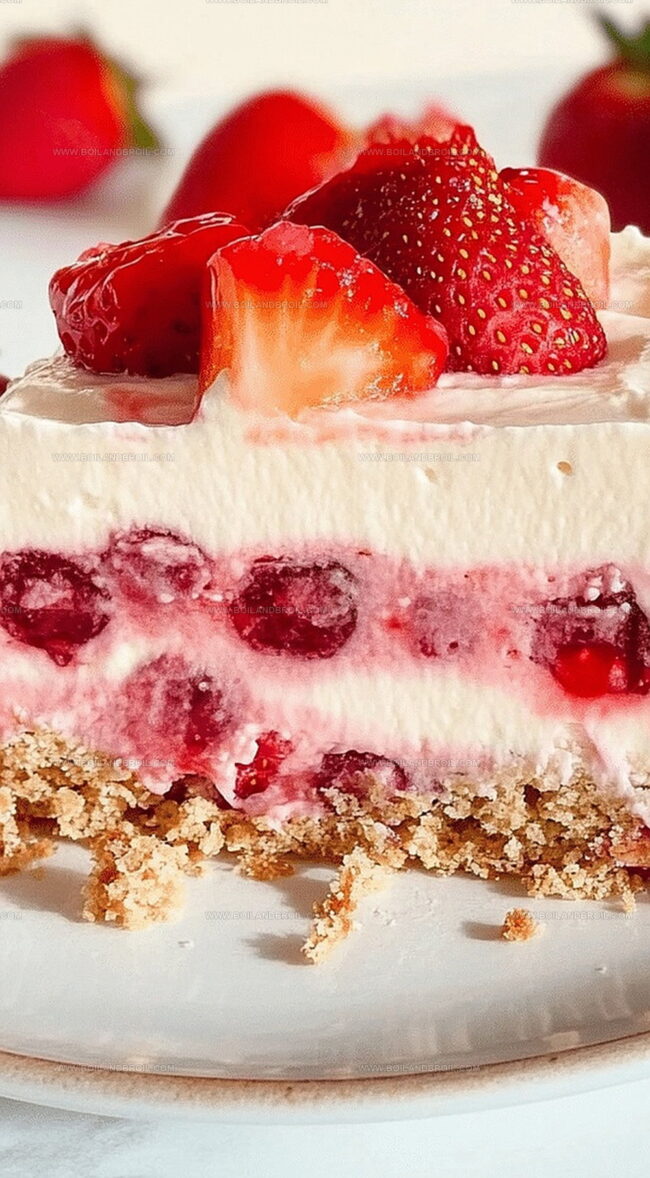
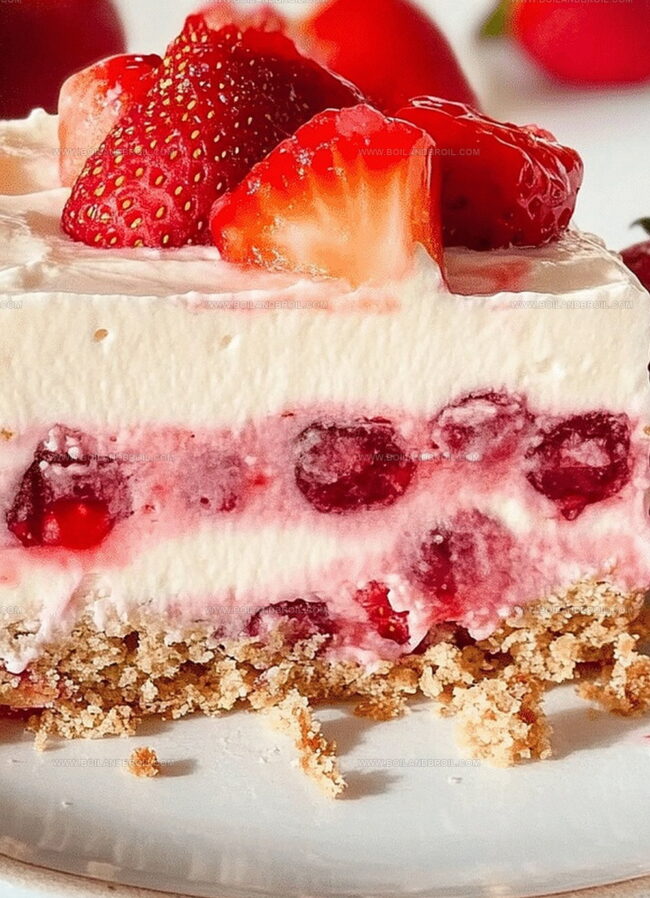
Crisp graham crackers create a perfect foundation for luscious whipped cream and ripe strawberries.
Each spoonful delivers a refreshing combination of textures that dance across your palate.
Layered with simplicity and elegance, this dessert promises to become a crowd-pleasing favorite at any gathering.
Chilled and ready in minutes, this strawberry icebox cake transforms simple ingredients into a spectacular summer sensation.
One bite will transport you to sunny afternoons and joyful celebrations.
Why Strawberry Icebox Cake Is So Refreshing

Everything You’ll Need for This No-Bake Favorite
Main Ingredients:Pudding Base:Optional Toppings:Layering Instructions for Strawberry Icebox Cake

Step 1: Whip Up Creamy Pudding Base
In a large mixing bowl, combine pudding mix and cold milk.
Whisk until the mixture becomes smooth and slightly thickened.
Ensure no lumps remain by mixing thoroughly.
Gently fold in Cool Whip until completely incorporated, creating a luscious, creamy mixture.
Step 2: Create Graham Cracker Foundation
Prepare a 9×13 inch pan by carefully lining the bottom with graham crackers.
You may need to break some crackers to create a complete, snug layer that covers the entire pan bottom.
Step 3: Layer First Pudding Blanket
Spread one-third of the pudding mixture evenly over the graham cracker base.
Use a spatula to smooth the surface.
Sprinkle fresh diced strawberries across the layer for bursts of fruity flavor.
Step 4: Build Delicious Layers
Add another complete layer of graham crackers on top of the first pudding layer.
Cover with a second layer of pudding mixture, again distributing diced strawberries evenly across the surface.
Step 5: Complete Final Layer
Repeat the layering process one more time:Ensure the top looks smooth and inviting.
Step 6: Chill and Set
Cover the pan completely with plastic wrap.
Refrigerate for 6-8 hours or overnight.
This resting time allows graham crackers to soften and absorb the creamy pudding.
Step 7: Serve and Enjoy
Remove from refrigerator and slice into square portions.
The cake should have soft, creamy layers with a delightful strawberry essence.
Serve chilled and watch everyone’s eyes light up!
Tips for Chilling and Slicing Perfect Layers

How to Store Icebox Cake for the Next Day
Dessert Pairings That Go Well With This Treat
Fun Ideas to Customize Your Icebox Cake
FAQs
Yes, you can substitute Cool Whip with homemade whipped cream. Just whip heavy cream until stiff peaks form and fold it into the pudding mixture carefully.
Vanilla instant pudding mix is the most recommended. It provides a neutral, creamy base that complements the strawberries perfectly.
Always remove the green stems and hull before dicing strawberries. This ensures a smooth texture and clean eating experience in your icebox cake.
Yes, simply replace graham crackers with gluten-free graham-style crackers or gluten-free vanilla wafers to make the entire dessert gluten-free.
Print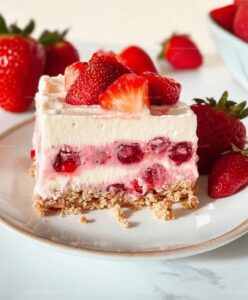
Strawberry Icebox Cake {no Bake} Recipe
- Total Time: 15 minutes
- Yield: 12 1x
Description
Sweet layers of graham crackers and luscious strawberry cream make this no-bake Strawberry Icebox Cake a summer dessert dream. Creamy, chilled, and effortlessly elegant, you’ll savor each refreshing bite of this simple yet irresistible treat.
Ingredients
Main Ingredients:
- 34 Strawberries, fresh, washed, diced, patted dry
- 1 Box graham crackers (14.4 ounces / 408 grams)
- 4 Cups whole milk, cold
- 2 Cups cool whip, full fat
Pudding Ingredients:
- 3 Boxes instant cheesecake pudding dry powder (3.4 ounces / 96 grams each), can also be replaced with vanilla pudding, full fat
Preparation Ingredients:
(None additional)
Instructions
- Prepare a velvety pudding mixture by whisking pudding mix with cold milk until silky smooth, ensuring no lumps form. Gently incorporate Cool Whip, creating a luscious, creamy base.
- Arrange graham crackers in a precise, snug layer across the bottom of a 9×13 pan, breaking pieces as needed to create complete coverage.
- Delicately spread one-third of the pudding mixture over the graham cracker foundation, creating an even layer. Scatter fresh diced strawberries across the surface.
- Construct subsequent layers by alternating graham crackers, pudding mixture, and strawberry pieces. Repeat the layering process, ensuring each stratum is evenly distributed.
- Crown the dessert with a final layer of pudding mixture, artfully garnishing with remaining strawberry pieces for visual appeal.
- Seal the pan with plastic wrap and refrigerate for 6-8 hours, allowing graham crackers to absorb moisture and layers to meld together harmoniously.
- After chilling, slice into perfect squares. The dessert will showcase soft, creamy layers with a delightful strawberry-infused texture.
Notes
- Opt for instant vanilla pudding mix to ensure a quick and smooth texture without lumps.
- Select ripe, sweet strawberries at peak season for the most intense flavor and vibrant color.
- Crush graham crackers into fine crumbs if you prefer a more uniform base layer that’s easier to slice.
- Make the dessert gluten-free by using gluten-free graham crackers or graham-style crackers.
- Enhance the strawberry flavor by adding a splash of strawberry extract to the pudding mixture.
- Prepare this dessert a day ahead for maximum flavor melding and graham cracker softening.
- Top with fresh whipped cream or a drizzle of chocolate sauce just before serving for extra indulgence.
- Prep Time: 15 minutes
- Cook Time: 0 minutes
- Category: Desserts
- Method: None
- Cuisine: American
Nutrition
- Serving Size: 12
- Calories: 220
- Sugar: 10 g
- Sodium: 150 mg
- Fat: 9 g
- Saturated Fat: 5 g
- Unsaturated Fat: 3 g
- Trans Fat: 0 g
- Carbohydrates: 30 g
- Fiber: 1 g
- Protein: 4 g
- Cholesterol: 20 mg
Clara Thompson
Recipe Developer & Culinary Educator
Expertise
Developing accessible single-serving recipes, Food writing and content creation, Plant-based and allergen-friendly cooking, Culinary education and workshop facilitation
Education
Oregon Culinary Institute (Portland, OR)
Diploma in Culinary Arts
Specialized in plant-based cooking and sustainable kitchen practices.
Portland Community College
Certificate in Food Writing and Media
Focused on recipe writing, food photography, and digital content creation.
Clara’s food journey began with a curiosity for color, texture, and ingredients pulled straight from the garden. Her background in plant-forward cooking and creative writing gives her a unique edge – she makes healthy, flavorful food feel inviting, not intimidating.
She specializes in meals that work for busy lives and different diets, all without sacrificing taste. Clara’s voice comes through in every recipe she writes – clear, kind, and encouraging.