
Try This Amazing Tinis Mac And Cheese Recipe Tonight
Creamy, comforting mac and cheese brings pure joy to every dinner table.
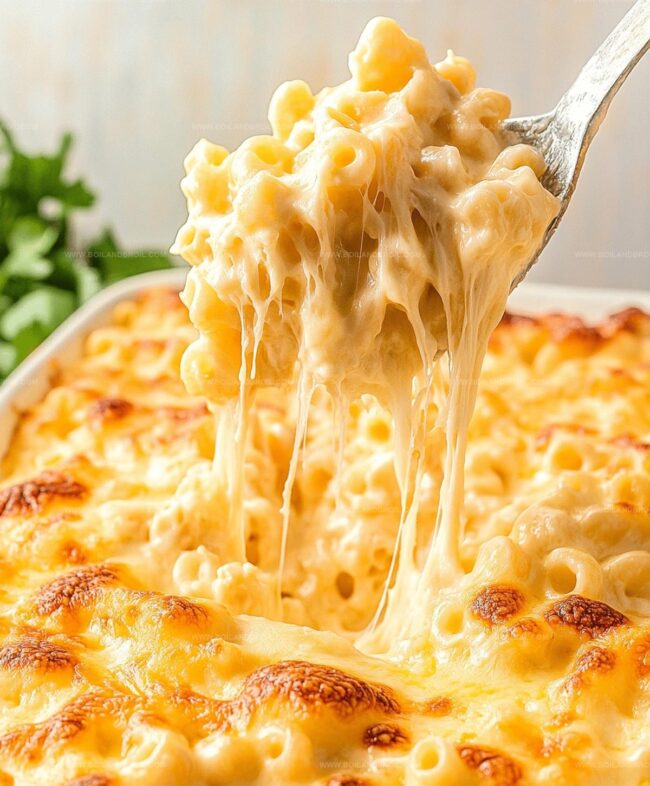
This classic mac and cheese recipe delivers a perfect blend of cheesy goodness that melts in your mouth.
Tender pasta shells cradle a rich, velvety sauce that combines sharp cheddar and smooth cream cheese.
Each bite promises pure comfort and warmth straight from the kitchen.
The secret lies in selecting high-quality cheeses and creating a silky smooth sauce that coats every pasta curve.
cheese lovers will absolutely adore this simple yet incredibly satisfying dish that comes together in under 30 minutes.
You’ll want to savor every single delicious spoonful of this irresistible mac and cheese.
What Sets Tini’s Mac and Cheese Apart

What You’ll Need for This Creamy Classic
Main Ingredients:Dairy and Cream Base:Seasoning and Flavor Enhancers:How to Make Tini’s Cheesy Mac Easily
Step 1: Warm Up The Oven
Crank the oven to a toasty 350°F.
Grab your cheese grater and shred those cheese blocks into fluffy clouds.
Mix the shredded cheese in a bowl and split them into two equal portions.
Step 2: Boil The Pasta
Drop cavatappi into a pot of salted water.
Cook until the pasta reaches that perfect al dente texture.
Once done, drain and give a light olive oil drizzle to prevent sticking.
Step 3: Create The Flavor Base
Fire up a large skillet over medium heat.
Melt butter and sprinkle half of your seasoning blend.
Whisk in flour, stirring continuously until the mixture turns nutty and starts to bubble.
Step 4: Build The Creamy Sauce
Pour evaporated milk slowly while whisking.
Add heavy cream, remaining seasoning, and mustard.
Let the sauce simmer and thicken for 4-5 minutes until it coats a spoon beautifully.
Step 5: Melt The Cheese Goodness
Incorporate cheese gradually, one handful at a time.
Stir until each addition melts completely, creating a silky smooth sauce.
Step 6: Layer The Cheesy Masterpiece
Fold pasta into the cheese sauce until every noodle is coated.
Transfer half to a baking dish, sprinkle cheese layer, then repeat with remaining pasta and cheese.
Step 7: Bake To Perfection
Bake for 25-30 minutes until bubbly.
Switch to broil for 1-2 minutes to achieve a golden crispy top.
Watch closely to prevent burning.
Step 8: Finish With Flair
Scatter fresh chopped parsley on top for a burst of color and flavor.
Serve hot and enjoy!
Kitchen Tips for Creamy, Cheesy Results

Reheating Tini’s Mac Without Drying It Out
Serving Suggestions for Cheesy Mac
Creative Cheese Mix-Ins to Try
FAQs
The roux is the crucial base that thickens the sauce and creates a rich, creamy texture. By cooking butter and flour together until nutty, you’re developing deep flavor and ensuring the sauce doesn’t become lumpy or taste like raw flour.
Freshly shredded cheese melts more smoothly and creates a creamier sauce. Pre-shredded cheese often contains anti-caking agents that can make your sauce grainy and prevent smooth melting.
The sauce should coat the back of a spoon, meaning when you run your finger through it, the line remains clear and the sauce doesn’t immediately run back together. This indicates it’s thick enough but not too heavy.
Cavatappi works best because its corkscrew shape holds the cheese sauce well, but you can use other short, ridged pastas like rigatoni or shells that also grip sauce effectively.
Print
Tinis Mac And Cheese Recipe
- Total Time: 50 minutes
- Yield: 4 1x
Description
Creamy mac and cheese recipe brings comfort straight from Southern kitchens, blending rich cheddar and smooth cream cheese into a delightful pasta experience. Southern charm meets culinary magic, inviting you to savor each cheesy, comforting bite.
Ingredients
Cheese:
- 1 pound mozzarella cheese (made with non-animal rennet)
- 8 ounces sharp cheddar (yellow preferred, made with plant-based rennet)
Pasta:
- 1 pound cavatappi pasta
Seasonings and Additives:
- 1 teaspoon smoked paprika
- 1 teaspoon coarse salt
- 1/2 teaspoon black pepper
- 3 tablespoons salted butter
- 3 tablespoons flour
- 1 (12 ounces) can evaporated milk
- 2 cups heavy cream
- 1 tablespoon mustard
- Fresh chopped parsley for garnish
Instructions
- Prepare the oven and cheese at 350°F. Manually shred cheese varieties, combining and dividing into two equal portions for strategic layering.
- Cook cavatappi in generously salted water until perfectly al dente. Drain and lightly coat with olive oil to prevent clumping, then set aside.
- Create a flavor-building roux in a large skillet. Melt butter over medium heat, incorporate half the seasoning mix. Whisk in flour, allowing it to develop a nutty aroma and create tiny bubbles, approximately one minute.
- Gradually introduce liquid components. Pour evaporated milk and heavy cream while continuously whisking. Add remaining seasoning and mustard. Simmer until sauce thickens and reaches a consistent coating consistency, roughly 4-5 minutes.
- Integrate cheese gradually into the sauce. Incorporate first cheese portion handful by handful, ensuring complete melting between additions to achieve a velvety smooth texture.
- Thoroughly coat pasta with cheese sauce. Transfer half the mixture into baking dish, sprinkle reserved cheese, then layer remaining pasta and cheese for maximum flavor distribution.
- Bake for 25-30 minutes until bubbling. Activate broiler for 1-2 minutes to create a golden crispy surface, monitoring closely to prevent burning.
- Finish with fresh parsley garnish, adding vibrant color and complementary herbal notes before serving.
Notes
- Customize cheese blend by mixing sharp cheddar, gruyere, or monterey jack for deeper flavor profiles.
- Prevent grainy sauce by grating cheese at room temperature and adding gradually while stirring constantly.
- Create gluten-free version by substituting all-purpose flour with cornstarch or gluten-free flour blend.
- Reduce sodium content by using low-sodium cheese and cutting back on added salt during seasoning process.
- Prep Time: 20 minutes
- Cook Time: 30 minutes
- Category: Dinner, Snacks
- Method: Baking
- Cuisine: American
Nutrition
- Serving Size: 4
- Calories: 880
- Sugar: 5 g
- Sodium: 700 mg
- Fat: 58 g
- Saturated Fat: 35 g
- Unsaturated Fat: 18 g
- Trans Fat: 0 g
- Carbohydrates: 62 g
- Fiber: 2 g
- Protein: 30 g
- Cholesterol: 150 mg
Clara Thompson
Recipe Developer & Culinary Educator
Expertise
Developing accessible single-serving recipes, Food writing and content creation, Plant-based and allergen-friendly cooking, Culinary education and workshop facilitation
Education
Oregon Culinary Institute (Portland, OR)
Diploma in Culinary Arts
Specialized in plant-based cooking and sustainable kitchen practices.
Portland Community College
Certificate in Food Writing and Media
Focused on recipe writing, food photography, and digital content creation.
Clara’s food journey began with a curiosity for color, texture, and ingredients pulled straight from the garden. Her background in plant-forward cooking and creative writing gives her a unique edge – she makes healthy, flavorful food feel inviting, not intimidating.
She specializes in meals that work for busy lives and different diets, all without sacrificing taste. Clara’s voice comes through in every recipe she writes – clear, kind, and encouraging.