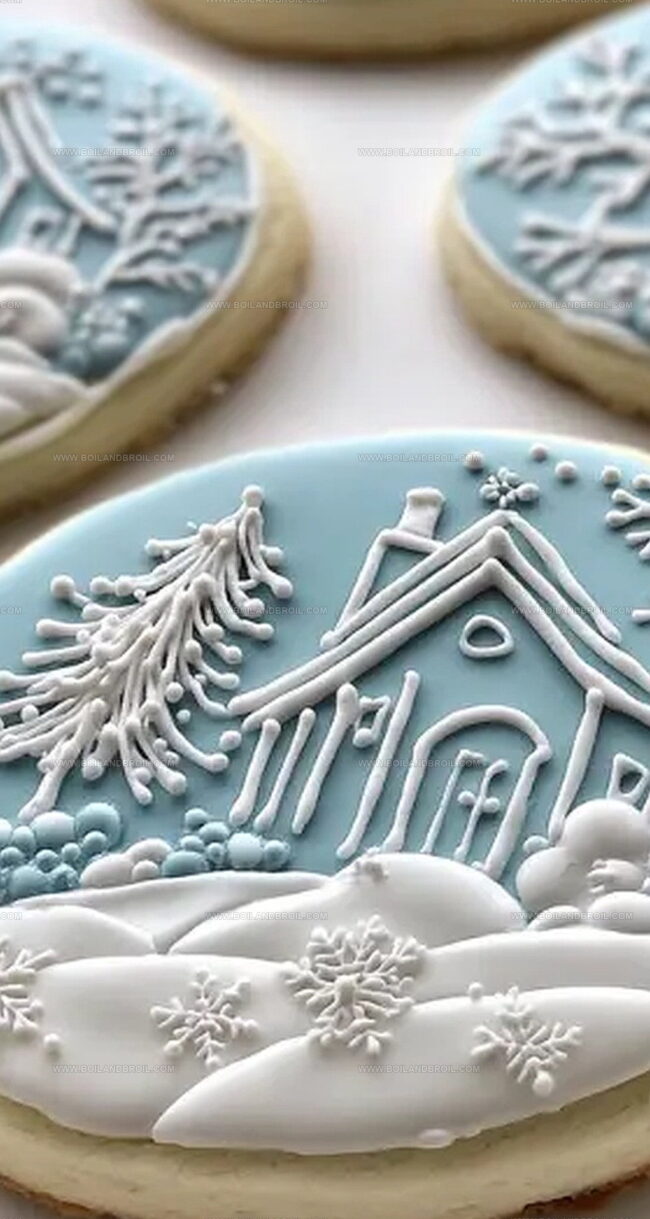
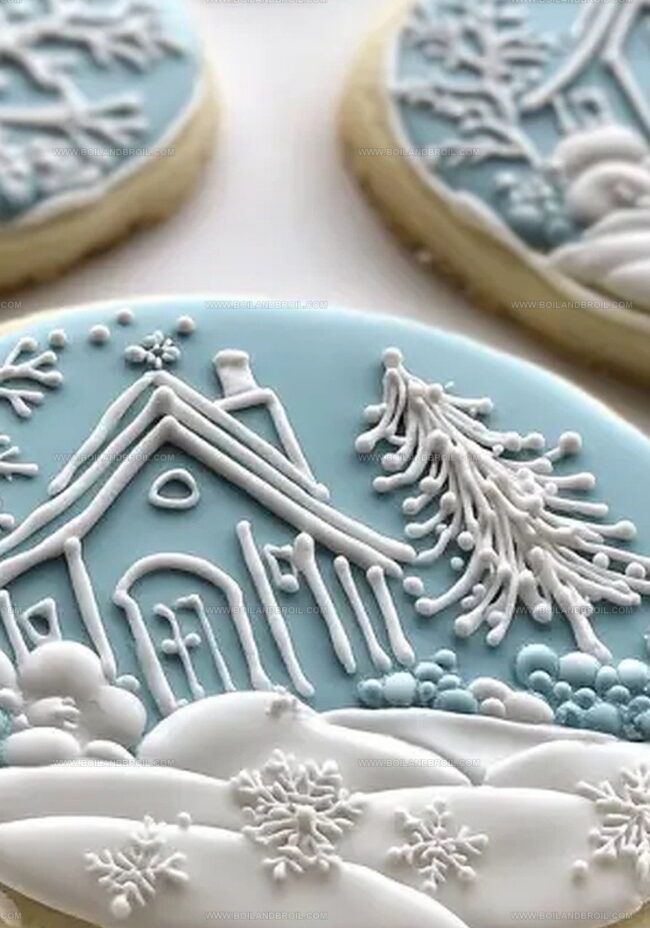
Sweet winter magic happens when classic sugar cookies meet festive winter wonderland charm.
Delicate snowflake designs sparkle against soft, buttery backgrounds that melt in your mouth.
Baking these treats fills kitchens with warm, comforting aromas that instantly transport you to cozy memories.
Intricate decorations transform simple cookies into edible art pieces that celebrate seasonal joy.
Crisp white royal icing and shimmering sugar crystals create elegant patterns reminiscent of gently falling snow.
Crafting these delightful cookies becomes a heartwarming activity that connects generations through shared culinary love.
Whip up this recipe and watch pure winter enchantment unfold on your plate.
Sugar Cookies That Taste Like Frosty Fun
Craft Winter Magic: Create enchanting sugar cookies that transform simple ingredients into festive edible art with minimal baking skills required.
Quick Kitchen Delight: Prepare these cookies easily with basic pantry staples, perfect for last-minute holiday gatherings or spontaneous baking sessions.
Family Bonding Treat: Engage kids and adults in a fun decorating activity that sparks creativity and produces delightful winter-themed cookies everyone will adore.
Impressive Presentation: Showcase stunning snowscape designs that look professionally made, making these cookies excellent for holiday parties, gift-giving, or seasonal celebrations.
Winter Wonderland Sugar Cookies What You’ll Need
Main Ingredients:
Dry Ingredients:
Flour: Provides the base structure for the sugar cookies.
Baking Powder: Helps the cookies rise and become light.
Salt: Enhances the overall flavor of the cookies.
Wet Ingredients:
Butter: Creates a rich and tender cookie texture.
Sugar: Adds sweetness and helps with cookie browning.
Egg: Binds the ingredients and provides structure.
Flavoring Ingredients:
Vanilla Extract: Adds classic sweet flavor.
Almond Extract: Provides a subtle nutty background note.
Decorating Ingredients:
Powdered Sugar: Base for royal icing.
Meringue Powder: Stabilizes the royal icing.
Water: Adjusts the consistency of the icing.
Food Coloring: Creates winter-themed blue and white colors for decoration.
Preparation Ingredients:
Parchment Paper: Prevents cookies from sticking to the baking sheet.
Flour (for dusting): Helps roll out the cookie dough smoothly.
Rolling Magical Winter Wonderland Sugar Cookies
Step 1: Create Cookie Base
Whisk flour, baking powder, and salt in a medium bowl. In a separate large bowl, beat butter and sugar until fluffy and light. Add egg, vanilla, and almond extract, mixing thoroughly. Gradually incorporate dry ingredients until dough forms. Wrap dough in plastic and refrigerate for one hour.
Step 2: Roll and Bake Cookies
Preheat oven to 350°F. Line baking sheet with parchment paper. Roll chilled dough on floured surface to 1/4-inch thickness. Cut cookies using round cutter, spacing them one inch apart. Bake for 8-10 minutes until edges turn golden. Cool cookies on baking sheet briefly, then transfer to wire rack.
Step 3: Whip Up Royal Icing
Combine powdered sugar and meringue powder in bowl. Slowly add water, mixing until smooth and perfect for piping. Separate icing and tint with light blue and white food coloring.
Step 4: Transform Cookies into Winter Scene
Flood each cookie with light blue icing, allowing complete drying. Once set, use white icing to create snowbanks, delicate trees, and winter-themed decorations. Let each layer dry before adding next detail to prevent smudging.
Sugar Cookie Tips That Capture a Winter Wonderland
Chill Dough Strategically: Refrigerate the cookie dough for at least 1 hour to prevent spreading and maintain crisp shapes during baking.
Roll with Precision: Use powdered sugar instead of flour when rolling out dough to prevent tough, dry cookies and maintain delicate texture.
Perfect Piping Technique: Hold royal icing piping bag at a 45-degree angle for smooth, consistent lines and clean winter-themed decorations.
Dry Between Layers: Allow each icing layer to completely set before adding intricate details to prevent colors from bleeding or blending.
Store Smartly: Keep decorated cookies in a single layer between parchment paper to preserve delicate designs and prevent cracking.
Store and Enjoy Winter Wonderland Cookies Later
Store cooled, undecorated cookies in an airtight container with parchment paper between layers for up to 5 days at room temperature.
Wrap plain or decorated cookies individually in plastic wrap, then place in a freezer-safe container for up to 3 months; thaw at room temperature for 30 minutes before serving.
Keep decorated cookies in a single layer in a sealed container away from direct sunlight and heat, consuming within 3-4 days for best taste and texture.
Add a small piece of bread to the storage container to maintain cookie softness and prevent them from becoming too dry or stale.
Winter Wonderland Cookies Frosty Companions
Cozy Winter Beverage Companion: Pair these delicate sugar cookies with warm vanilla chai tea, creating a comforting blend of sweet and spicy flavors that perfectly complement the cookies’ delicate winter theme.
Festive Dessert Wine Match: Select a light, slightly sweet Moscato d’Asti to enhance the cookie’s subtle almond and vanilla notes, offering a sparkling and elegant drinking experience that matches the cookie’s delicate decoration.
Creamy Hot Chocolate Pairing: Serve alongside rich, homemade hot chocolate topped with marshmallows, allowing the warm drink to melt alongside the intricate winter-themed cookies for a nostalgic and indulgent winter treat.
Elegant Coffee Complement: Brew a smooth, medium-roast coffee with hints of caramel and hazelnut to provide a warm, rich backdrop that highlights the sugar cookies’ delicate sweetness and intricate winter design.
Winter Wonderland Sugar Cookie Creations
Gluten-Free Winter Wonders: Replace wheat flour with almond or gluten-free all-purpose flour blend, ensuring the same delicate texture and flavor profile.
Vegan Snowflake Cookies: Swap butter with coconut oil or vegan margarine, use aquafaba instead of egg, and create plant-based royal icing using powdered sugar and plant milk.
Reduced-Sugar Frosty Treats: Substitute regular sugar with stevia or monk fruit sweetener, maintaining the cookie’s lightness while cutting down on calories.
Keto-Friendly Snowscape: Use almond flour, replace sugar with erythritol, and create a low-carb royal icing using sugar-free powdered sweetener and cream cheese for binding.
FAQs
Are these sugar cookies difficult to make for beginners?
These cookies are beginner-friendly. The recipe requires basic baking skills, and the steps are straightforward. Just follow the instructions carefully, chill the dough, and take your time decorating.
Can I make the dough ahead of time?
Yes, you can prepare the cookie dough up to 3 days in advance. Wrap it tightly in plastic wrap and store in the refrigerator. When ready to bake, let the dough sit at room temperature for 10-15 minutes to soften slightly.
What tools do I need for decorating these winter cookies?
You’ll need piping bags or squeeze bottles, royal icing, food coloring, and small offset spatulas or toothpicks for detailed designs. A steady hand and some patience will help create beautiful winter-themed cookies.
How long will these cookies stay fresh?
When stored in an airtight container at room temperature, these decorated sugar cookies will remain fresh for about 5-7 days. Keep them in a single layer to prevent the icing from smudging.
Developing accessible single-serving recipes, Food writing and content creation, Plant-based and allergen-friendly cooking, Culinary education and workshop facilitation
Education
Oregon Culinary Institute (Portland, OR) Diploma in Culinary Arts
Specialized in plant-based cooking and sustainable kitchen practices.
Portland Community College Certificate in Food Writing and Media
Focused on recipe writing, food photography, and digital content creation.
Clara’s food journey began with a curiosity for color, texture, and ingredients pulled straight from the garden. Her background in plant-forward cooking and creative writing gives her a unique edge – she makes healthy, flavorful food feel inviting, not intimidating.
She specializes in meals that work for busy lives and different diets, all without sacrificing taste. Clara’s voice comes through in every recipe she writes – clear, kind, and encouraging.

Clara Thompson
Recipe Developer & Culinary Educator
Expertise
Developing accessible single-serving recipes, Food writing and content creation, Plant-based and allergen-friendly cooking, Culinary education and workshop facilitation
Education
Oregon Culinary Institute (Portland, OR)
Diploma in Culinary Arts
Specialized in plant-based cooking and sustainable kitchen practices.
Portland Community College
Certificate in Food Writing and Media
Focused on recipe writing, food photography, and digital content creation.
Clara’s food journey began with a curiosity for color, texture, and ingredients pulled straight from the garden. Her background in plant-forward cooking and creative writing gives her a unique edge – she makes healthy, flavorful food feel inviting, not intimidating.
She specializes in meals that work for busy lives and different diets, all without sacrificing taste. Clara’s voice comes through in every recipe she writes – clear, kind, and encouraging.